
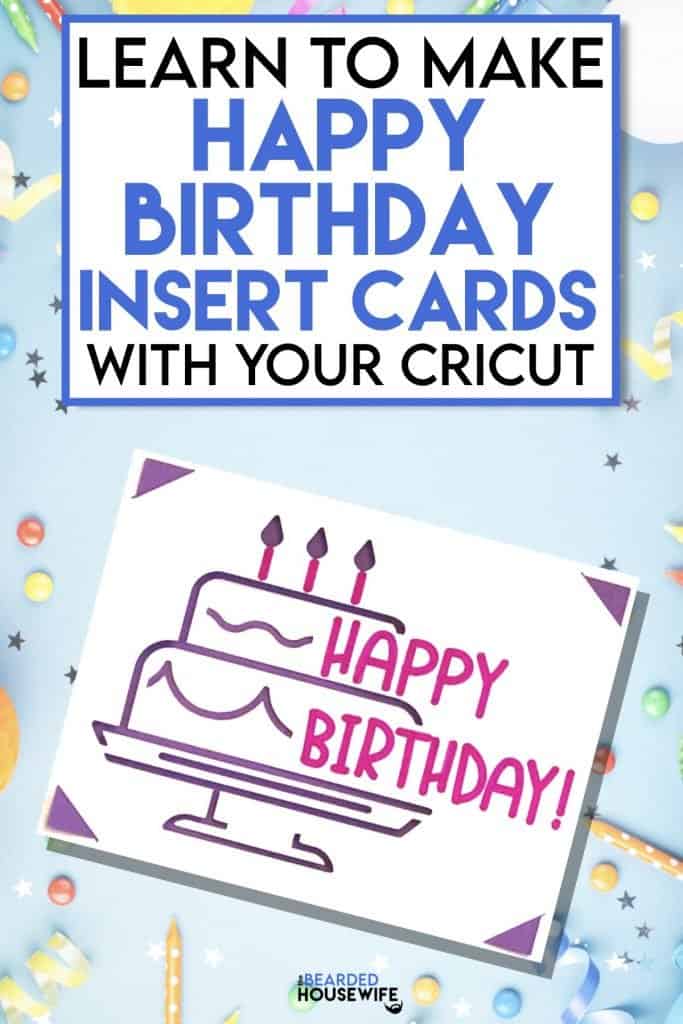
Happy Birthday Insert Cards

LEARN HOW TO MAKE FUN BIRTHDAY CARDS USING ANY OF YOUR CRICUT MACHINES!
Okay, everyone! By now, you all know that I LOVE to make cards on my Cricut and this Happy Birthday insert card is no exception!
After I posted my New Years Insert Card, I received an email from one of the readers of the blog asking if I had a birthday version. At the time, I didn't but got to work and designed something pretty cool. So you all need to thank Michele for the idea!
I designed this card to be made using any Cricut, or other brand, cutting machine you have! In the download, you will find two folders inside. One for Maker/Explore and one for Joy.
Note: The version for the Cricut Joy is only the design so it would be best to use Cricut's Insert Card Packs available at most craft stores! For more information on how to use this design with a Cricut Joy, please take a look at my Cricut Joy New Years Insert Card tutorial!
In this tutorial, I’ll give you my step by step instructions and tell you what materials I think work best when making this project.
This free file can be found in the Free File Library for Free Members.
Basic and Premium Members can download the SVG cut file for this project in the File Library.
Not a Member? Click here or the link at the bottom of the page to join!
This post contains some affiliate links (which means if you make a purchase after clicking a link, I will earn a small commission at no additional cost to you). Read my full disclosure policy here.
HAPPY BIRTHDAY INSERT CARDS – MATERIALS LIST
- I am using my Cricut Maker. You could also use your Cricut Explore Air 2, Cricut Explore 3, Cricut Maker 3, or Cricut Joy!!
- Cricut StandardGrip Cutting Mat (green)
- Cricut Scoring Wheel or Scoring Stylus
- Cricut Cardstock in your choice of color
- Cricut Pen. I am using Magenta.
- Cricut Scraper
- Glue or adhesive like Crafter’s Tape or Art Glitter Glue

Happy Birthday Insert Cards
This design can be used with your Cricut Maker, Explore Air 2, or Joy machine to make a fun and easy birthday card!
Materials
- My FREE Happy Birthday Insert Card SVG File
- Cricut Cardstock
Tools
- A way to cut out your cardstock. I am using my FABULOUS Cricut Maker!
- Cricut StandardGrip Cutting Mat (green)
- Cricut Scoring Wheel or Stylus
- Cricut Pen
- Glue or adhesive
- Cricut Scraper
Instructions
STEP 1 - DOWNLOAD THE SVG CUT FILE
Download the SVG Cut file for the Happy Birthday Insert Card (#58) from The File Vault. Get access by joining the club.
Note: Within the download, you will find two versions of this card. One for the Maker/Explore and one for the Joy. For this tutorial, I will be using the Maker/Explore version. You choose based on your machine!
STEP 2 - UPLOAD THE SVG FILE TO CRICUT DESIGN SPACE
If you aren't familiar with uploading SVG files into Design Space, take a look at my quick and easy tutorial here. Using your smartphone? Click here for my step-by-step guide on uploading SVG files with the Cricut App.
Everything has been set for you. All you need to do once the design has been imported into Design Space is click the green MAKE IT button.

STEP 3 - MAKE YOUR MATERIAL SELECTIONS AND PREPARE YOUR MATS
You will see the three layers for this card in the mat preview. Click the CONTINUE button.

For this tutorial, I am using Medium Cardstock. Select your materials accordingly.
Attach your cardstock to the Cricut StandardGrip Mat.
STEP 4 - LOADING YOUR MATS AND CUTTING YOUR MATERIALS
To load the mat into the machine, press the double arrows button. Do make sure that the mat is positioned under the mat guides.

Hit the "C" button once it begins to flash and you are on your way to
creating your card! Follow the prompts in Design Space on when to change out the different tools.

Repeat Step 4 until all layers have been cut.
STEP 5 - ASSEMBLE YOUR CARD
Now that all layers have been cut, you can assemble this birthday card.

Begin by folding along the score line of the outer card layer.

Press the fold with your scraper.

Now, carefully place the card insert layer into the tabs in the outer card layer.

Add a small amount of glue or adhesive to any portions of the outer layer that may be curling a little. This is something I do for all my insert cards but is totally optional.

Your card is done.

To make the envelope, fold along the score lines.

Add adhesive to the inner tabs and press closed.


Your card is ready to add a birthday message!
This card is so fun to make, such a quick win, and I know will make the birthday boy or girl smile!
Post a photo in the comment section or tag your projects on social media @thebeardedhousewife using the hashtag #beardedhousewife! I’d love to see how yours turn out!!
Love,

WANT THE FREE SVG TO MAKE THIS PROJECT YOURSELF?
SIGN UP FOR A FREE ACCOUNT AND GET ACCESS TO THIS CUT FILE AND OVER 50 MORE PLUS OUR EXCLUSIVE COMMUNITY!
WANT TO REMEMBER THIS POST FOR LATER? PIN THIS POST TO YOUR FAVORITE PINTEREST BOARD!
What is the font you used to write out Happy Birthday? I like how the Cricut filled in the font and did not just draw the lines of the letters leaving it with the bubble effect.
Kimberly,
The font I used is called Birthday Cake from FontBundles.net. I created the fill in my design software. The font will still create the bubble effect if you import it into Design Space.
I hope that helps!
Nick
Thank you, made this as my first item on my new Cricut Explore Air 2. You made it sound clear and easy enough that I had to try it.
Congratulations on your Explore Air 2, Pam! I’m so happy my tutorial was easy to follow!
Hi Nick, I am fairly new to Cricut, so forgive me if this is a dumb question. I love this card, but when the pens are writing, they go over, and over, and over the same spot to the point that the paper shreds. I tried with a few different pens and different card stock, but nothing helped. Some suggested it may be an issue with the file?
Thanks!
Hi, Shelly!
First off, there’s no such thing as a done question!
I’m sorry you’re having issue with this file. I have not ever heard anyone say their paper has shredded.
I was going to suggest a heavier cardstock (at least 80 pound) but you said you’ve tried other cardstock.
Would you mind emailing me a picture of the shredded card? I want to take a look so I can give you the best advice I can.
hello@thebeardedhousewife.com
In the meantime, I’ll take a look at the file and see if anything is off!
😊
Hello, I am trying this as my first card on our Cricut Maker. I am definately new and no expert on Design Space. When I import the SVG file and then upload it and select it, when I get to the screen that shows the steps, Score, Draw, Cut etc, all mine are set as cut. I can go in and change them to score and draw and such but then when I go to make it everything looks out of place and nothing like what you have. Any suggestions on what Im doing wrong or steps im missing would be greatly appreciated. Thanks!!
Hi, Scott.
You aren’t doing anything wrong. In a new update, Design Space isn’t importing any preset score and draw lines. My designer friends and I are really bummed because it makes things so much easier for our subscribers.
Anyway, after you upload the design, ungroup the whole thing. Then, change the text from basic cut to pen and the fold like from basic cut to score.
Then, highlight the entire group that contains the score line, text, and card layer.
Under the layers panel, click attach and you should be ready to go to Make It.
Let me know if you have any questions!!
Nick
mine never drew because it was all set to cut so not sure if i start it all over or just leave the Happy birthday out
After a recent update, we designers are no longer able to preset the draw and score lines in our designs. So, there is a step missing.
Please use the following tutorial to change the cut lines to draw lines for the text on this card.
https://thebeardedhousewife.com/how-to-use-the-operation-menu-in-cricut-design-space/
Let me know if you have any other questions.
Hi Nick
I am going to make this tomorrow. Is there any way to add a number on the text eg Happy 50th Birthday.
Thanks