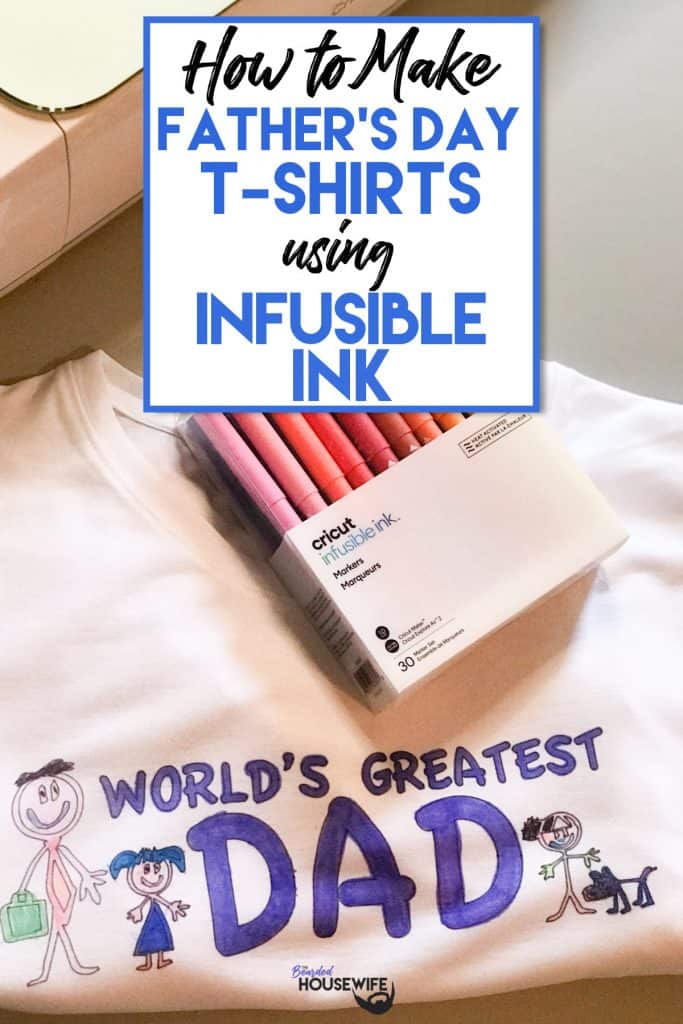
Infusible Ink Father’s Day T-Shirt


HOW TO MAKE A CUSTOM FATHER’S DAY T-SHIRT USING INFUSIBLE INK
Father’s Day is upon us. Make Dad feel special with this Infusible Ink Father’s Day T-shirt!
First, you use your Cricut Machine to draw my FREE SVG file, which you can get by filing out the form below. Next, your kids (or you) can color the image to make a custom shirt with your own spin on it. Lastly, use your EasyPress 2 to press the artwork into your shirt, infusing the ink into the fibers!
In this tutorial, I’ll give you my step by step instructions and tell you what materials I think work best when making this project.
This free file can be found in the Free File Library for Free Members.
Basic and Premium Members can download the SVG cut file for this project in the File Library.
Not a Member? Click here or the link at the bottom of the page to join!
Note: I designed this artwork to be customizable. The SVG file has multiple children, a dad and mom, and a dog and cat. You can edit it how you please to make it look like your family!
This post contains some affiliate links (which means if you make a purchase after clicking a link, I will earn a small commission at no additional cost to you). Read my full disclosure policy here.
INFUSIBLE INK FATHER'S DAY SHIRT – MATERIALS LIST
- I am using my Cricut Maker. You could also use your Cricut Explore Air 2, Cricut Explore 3, or Cricut Maker 3!
- Cricut LightGrip Cutting Mat (blue)
- Cricut Infusible Ink Pens
- Cricut Infusible Ink T-Shirt Blank. I am using White but they also come in Gray.
- Copy Paper
- Cricut EasyPress 2
- Cricut EasyPress Mat
- Cricut Heat Resistant Tape
- Butcher Paper or White Cardstock

Infusible Ink Father's Day T-Shirts
This custom t-shirt is the perfect Father's Day gift! It uses my FREE SVG file to create a artwork that you or your children can color. Then, use your Cricut Easy Press to infuse the image into the shirt! He will love it!
Materials
- My FREE World's Greatest Dad SVG file
- Copy Paper
- Infusible Ink Markers
- Cricut Infusible Ink T-Shirt Blank
- Butcher Paper
- Cricut Heat Resistant Tape
Tools
- A way to draw the artwork. I am using my Cricut Maker!
- Cricut LightGrip Cutting Mat (blue)
- Cricut EasyPress 2
- Cricut EasyPress Mat
Instructions
STEP 1 - DOWNLOAD THE SVG CUT FILE
Download the SVG Cut file for the World's Greatest Dad (#9) from The File Library. Not a member? Get access by joining the club.
STEP 2 - UPLOAD THE SVG FILE TO CRICUT DESIGN SPACE
If you aren't familiar with uploading SVG files into Design Space, take a look at my quick and easy tutorial here. If you are on your smartphone, here is my tutorial on using the Cricut App.
STEP 3 - CHANGE IMAGE FROM CUT TO DRAW
The image will upload into Cricut Design Space as a CUT file. You will want to change that to DRAW here.
You know you did this correctly when you see the image change to an outline.
STEP 4 - SELECT INFUSIBLE INK MARKER AS DRAWING TOOL
You can change the type of drawing tool you are using here. Select the infusible ink marker you want. This step isn't 100% necessary but I like my machine to know what tools I am using.
STEP 5 - ATTACH THE FILE TOGETHER
If you do not do this step, the different parts of the image will not group together. By selecting the ATTACH button, it will keep everything in place.
STEP 6 - PREPARE YOUR MATS AND MAKE MATERIAL SELECTION
Make sure you MIRROR the image!
You will want to select COPY PAPER as your material. This is the paper that Cricut recommends for infusible ink projects.
STEP 7 - LOADING YOUR MATS AND MAKING THE IMAGE
Load your Infusible Ink Marker into CLAMP A. Push down until you hear a the marker click into place. You can remove the cutting blade from CLAMP B if you wish, I just leave mine alone. It will not harm your image.
Apply the copy paper to the LightGrip Cutting Mat and load into the machine by pressing the flashing ARROW button.
Hit the "C" button once it begins to flash and you are on your way to making your image!
Once the machine has completed the drawing, the double arrows will flash again. Press it and the mat will unload.
When removing the copy paper from the mat, flip upside down. Peel the mat off the paper instead of the paper off the mat. This will prevent the image from curling.
STEP 8 - COLOR YOUR IMAGE
You, or your children, now get to color the page to turn the gift into something really special - like a walking work of art! Get colorful! Get creative!
STEP 9 - PREHEAT YOUR EASYPRESS 2
According to the Cricut EasyPress Heat Guide, found here, the temperature should be set to 385 degrees Fahrenheit. Set that temperature by pressing the temperature icon. Once the temperature starts to flash, you can increase it using the arrows.
STEP 10 - PREPARE YOUR T-SHIRT BLANK
While your EasyPress is coming up to temp, prep your shirt. I like to first fold the shirt in half. Then lightly press the shirt using the EasyPress. This will help me line up the image to ensure I have it straight.
Note: The EasyPress does not have to be fully to temperature yet because you are just wanting to create a guide for your image as well as iron out any wrinkles.
Insert the EasyPress Mat inside the shirt along with two pieces of WHITE cardstock or several sheets of copy paper. This helps prevent color bleeding through and ruining your mat and back of shirt.
Next, roll your shirt with the lint roller. This will help to remove any fuzz or dust that could be infused into the shirt accidentally.
Lightly crease the image in the middle so to line up the middle of the image with the middle of the shirt.
STEP 11 - PRESS YOUR T-SHIRT
Before applying your image, you have to heat your shirt. The Cricut Heat Guide from above states you should heat the shirt for 15 seconds.
STEP 12 - APPLY IMAGE TO SHIRT
Place your design face down (ink side down).
STEP 13 - ADD HEAT RESISTANT TAPE & BUTCHER PAPER
Apply to top and bottom of design to help secure to the shirt. This also prevents and ghosting of the image as you move your EasyPress 2 around.
Once taped, cover image with butcher paper.
STEP 14 - PRESS IMAGE INTO SHIRT
According to the Cricut Heat Guide, press your shirt for a total of 40 seconds with light pressure. I have the 9 x 9 EasyPress 2 so I did this in two sections making sure each area of my image got the full 40 seconds.
STEP 15 - REVEAL YOUR DESIGN
Slowly lift press off your design making sure to lift straight up. Remove the butcher paper and, carefully, peel off heat resistant tape. CAUTION: Tape and shirt will be warm!
Peel your design paper from shirt revealing your pressed shirt with your custom artwork now INFUSED into the shirts fibers!!
I am sure the Dad you are celebrating will love this unique shirt!
Post a photo in the comment section or tag your projects on social media @thebeardedhousewife using the hashtag #beardedhousewife! I’d love to see how you transform this design!
Would you like a cool card to go with this awesome shirt? Check out my tutorial on how to make my DIY Tool Box Card!
Love,

WANT THE FREE SVG TO MAKE THIS PROJECT YOURSELF?
SIGN UP FOR A FREE ACCOUNT AND GET ACCESS TO THIS CUT FILE AND OVER 50 MORE PLUS OUR EXCLUSIVE COMMUNITY!
WANT TO REMEMBER THIS POST FOR LATER? PIN THIS POST TO YOUR FAVORITE PINTEREST BOARD!


Responses