
DIY School Milestone Signs

LEARN TO MAKE PHOTO WORTHY SIGNS TO COMMEMORATE THE FIRST DAY OF SCHOOL
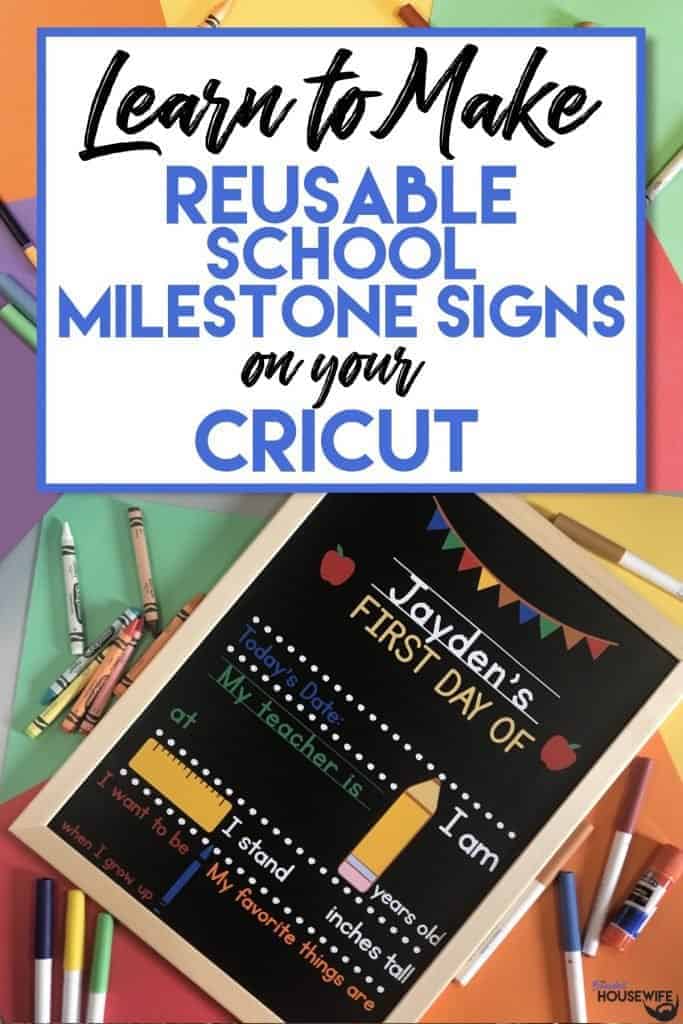
The school year is approaching. YAY! Make these adorable School Milestone Signs to create photo memories commemorating the start of the new year! The best part…. they are reusable!!
With so many students doing virtual or online classes, I know parents are feeling uneasy about the year. However, that doesn't mean we should let our kids see that uneasiness, right?
In this tutorial, I’ll give you my step by step instructions and tell you what materials I think work best when making this project.
This free file can be found in the Free File Library for Free Members.
Basic and Premium Members can download the SVG cut file for this project in the File Library.
Not a Member? Click here or the link at the bottom of the page to join!
This post contains some affiliate links (which means if you make a purchase after clicking a link, I will earn a small commission at no additional cost to you). Read my full disclosure policy here.
SCHOOL MILESTONE SIGNS – MATERIALS LIST
- I am using the FABULOUS Cricut Maker. You could also use your Cricut Explore Air 2 !
- Cricut StandardGrip Cutting Mat (green)
- Vinyl. I am using Oracal 631.
- Transfer Tape
- Cricut Weeding Tool
- Cricut Scraper
- Blank Chalkboard
- Chalk Markers or Chalk

Customizable School Milestone Chalkboards
This tutorial will show you step by step how I made reusable chalkboards to commemorate the first day of school!
Materials
- My FREE School Days SVG file
- Vinyl in your choice of colors. I am using Oracal 631 Vinyl.
- Transfer Tape
- A blank chalkboard
- Chalk Markers or Chalk
Tools
- A way to cut your vinyl. I am using my FABULOUS Cricut Maker.
- Cricut StandardGrip Cutting Mat (green)
- Cricut Weeding Tool
- Cricut Scraper
Instructions
STEP 1 - DOWNLOAD THE SVG CUT FILE
Download the SVG Cut file for this School Milestone Chalkboard (#25) from The File Vault. Get access by joining the club.
STEP 2 - UPLOAD THE SVG FILE TO CRICUT DESIGN SPACE
If you aren't familiar with uploading SVG files into Design Space, take a look at my quick and easy tutorial here. If you are on your smartphone, here is my tutorial on using the Cricut App.
STEP 3 - MEASURE INSIDE CHALKBOARD DIMENSIONS AND SIZE ACCORDINGLY
Once the image has been uploaded into Cricut Design Space, change the size of the artwork to fit inside your chalkboard. You want to make sure the LOCK button is not clicked to UNLOCK. This will ensure the dimensions of the image stay intact as you are resizing. For this tutorial, I am using the Darice Chalkboard (link above) and the artwork is sized accordingly.
STEP 4 - UNGROUP THE IMAGE
Click the ungroup button to separate the layers.

STEP 5 - ADD YOUR CHILD'S NAME
For this tutorial, I am using the KG Penmanship font that I downloaded and uploaded from DaFont.com.
If you need help uploading fonts into Cricut Design Space, check out my tutorial here. I go over how to upload fonts using a Mac, PC, and mobile device.
Select the TEXT option on the sidebar.

TYPE your child's name out.

Go into the TEXT drop down menu to search for your uploaded font and SELECT it.

Change the LETTER SPACING if necessary. For this tutorial, I changed the spacing to ZERO (0).

STEP 6 - PLACE YOUR CHILD'S NAME INTO THE DESIGN
Add your child's name to the chalkboard design above "First Day Of".

RESIZE and CENTER to your liking.

SELECT your child's name layer and the layer with the rest of the WHITE artwork (i.e. the dots, "I am years old", "I stand inches tall").

Click ATTACH in the lower right hand corner. This will ensure everything cuts on the mat where together.

Optional: You can repeat this step of attaching like colors together to help you with the placement of your vinyl. I like to do this sometimes to ensure everything is straight and lines up perfectly!

Before we are ready to prep our mats, make sure to deselect the BLACK rectangle. This is not needed on the final project. I just wanted to have that to visualize how the final chalkboard will look.

Select the GREEN Make it button.

STEP 7 - PREPARE YOUR MATS AND MAKE MATERIAL SELECTION
Select VINYL as your base material.

STEP 8 - LOADING YOUR MATS AND CUTTING YOUR MATERIALS
Attach your vinyl to the Cricut StandardGrip Mat. Make sure to smooth out any wrinkles in the vinyl!
To load the mat into the machine, press the double arrows button. Do make sure that the mat is positioned under the mat guides.

Hit the "C" button once it begins to flash and you are on your way to cutting out your vinyl!

Once the cut is complete, the double arrows will flash again. Press it and the mat will unload.
When removing the vinyl, peel your mat away from the vinyl rather than peeling your vinyl away from the mat. This will help prevent excess curling.
Repeat step 8 until all layers are cut.
STEP 9 - WEED YOUR VINYL
I like to weed intricate cuts on the mat before I move on to the next cut. It is a personal preference and is totally up to you. However, the mat does act as a third hand!
Weed all layers of your chalkboard sign.
STEP 10 - ASSEMBLE YOUR SIGN
To start, apply transfer tape to the white vinyl layer.

Remove the backing from the vinyl.

Apply to your blank chalkboard.

Use your Cricut Scraper to help adhere the vinyl and remove any air bubbles.

Repeat for all remaining layers. I recommend the following order:
Brown

Cream

Red


Blue

Orange

Darker yellow


Pink and light blue

Green


STEP 11 - ADD YOUR CHILD'S SCHOOL INFORMATION
To do this, I recommend chalk markers. I have a link to the set I use in the blog post.
After you have taken your photos, you can wipe off the chalk marker with a damp cloth and your sign is ready for next year!
I love how bright and colorful these signs turned out! My kids were jumping up and down when I showed them! To me, that just adds to the excitement of starting another year of learning!
Post a photo in the comment section or tag your projects on social media @thebeardedhousewife using the hashtag #beardedhousewife! I’d love to know what you think!
Love,

WANT THE FREE SVG TO MAKE THIS PROJECT YOURSELF?
SIGN UP FOR A FREE ACCOUNT AND GET ACCESS TO THIS CUT FILE AND OVER 50 MORE PLUS OUR EXCLUSIVE COMMUNITY!
WANT TO REMEMBER THIS POST FOR LATER? PIN THIS POST TO YOUR FAVORITE PINTEREST BOARD!
Awesome tutorial. I love used an old picture frame and using a dry eraser pen. I’ll share on IG and tag you.
Thank you, Criselda! I’d love to see how yours turned out!!