
Retro Christmas Cards


LEARN TO MAKE RETRO CHRISTMAS CARDS EASILY USING THE PRINT THEN CUT OPTION OF YOUR CUTTING MACHINE
Ok, let's face it. There is just not enough time the closer you get to Christmas. I never am able to finish all the things! That is why I needed a quick win and made these retro Christmas Cards that uses the print then cut option on my Cricut!
Print then Cut is available on the Cricut Explore Air 2 and the Cricut Maker as well as a few other brands of cutting machines.
These cards can be made really quick and I have even included an envelope in the download!
In this tutorial, I’ll give you my step by step instructions and tell you what materials I think work best when making this project.
Basic and Premium TBH Crafters Club Members can download the SVG cut file for this project in the File Library.
Not a Member? Click here or the link at the bottom of the page to join!
This post contains some affiliate links (which means if you make a purchase after clicking a link, I will earn a small commission at no additional cost to you). Read my full disclosure policy here.
RETRO CHRISTMAS CARDS – MATERIALS LIST
- I am using my Cricut Maker. You could also use your Cricut Explore Air 2, Cricut Explore 3, or Cricut Maker 3!
- Your home printer
- Cricut Scoring Wheel or Scoring Stylus
- Cricut StandardGrip Cutting Mat (green)
- White Cardstock
- Cricut Scraper
- Glue or adhesive to make the envelope.

Retro Christmas Cards
This simple Christmas Card has a retro vibe and is made easily using the print then cut option of your cutting machine!
Materials
- My Holly Jolly Christmas Card PNG File
- Cricut Cardstock
Tools
- Your Home Printer
- A way to cut out your cardstock. I am using my FABULOUS Cricut Maker
- Cricut StandardGrip Cutting Mat (green)
- Cricut Scraper
- Glue or adhesive to assemble the envelope
Instructions
STEP 1 - DOWNLOAD THE PNG FILE
Download the PNG file for the Holly Jolly Christmas Card (#54) from The File Vault. Get access by joining the club.
STEP 2 - UPLOAD THE PNG FILE TO CRICUT DESIGN SPACE
We are uploading the PNG file.
If you aren't familiar with uploading SVG files into Design Space, take a look at my quick and easy tutorial here. Using your smartphone? Click here for my step-by-step guide on uploading SVG files with the Cricut App.
To upload the PNG, find where you downloaded the file onto your computer and open it.
In the IMAGE TYPE MENU, Select COMPLEX.

Select the magic wand in the top left corner.

Click anywhere on the background (the grayed out portion).

Then press CONTINUE.

Make sure to select PRINT THEN CUT and click SAVE.

Highlight the image and select INSERT IMAGE to bring the file into your canvas.
STEP 3 - RESIZE YOUR IMAGE AND ADD A SCORE LINE
After your image has been brought into your canvas, change the height of the image in the SIZE panel.
Without unlocking your image, change the height to 4.5 inches.

In the tool bar, select the SHAPES menu.

In the shapes menu, select SCORE LINE.

Change the height of your score line to 4.5 inches.

Move your score line over the card.

Highlight both layers.
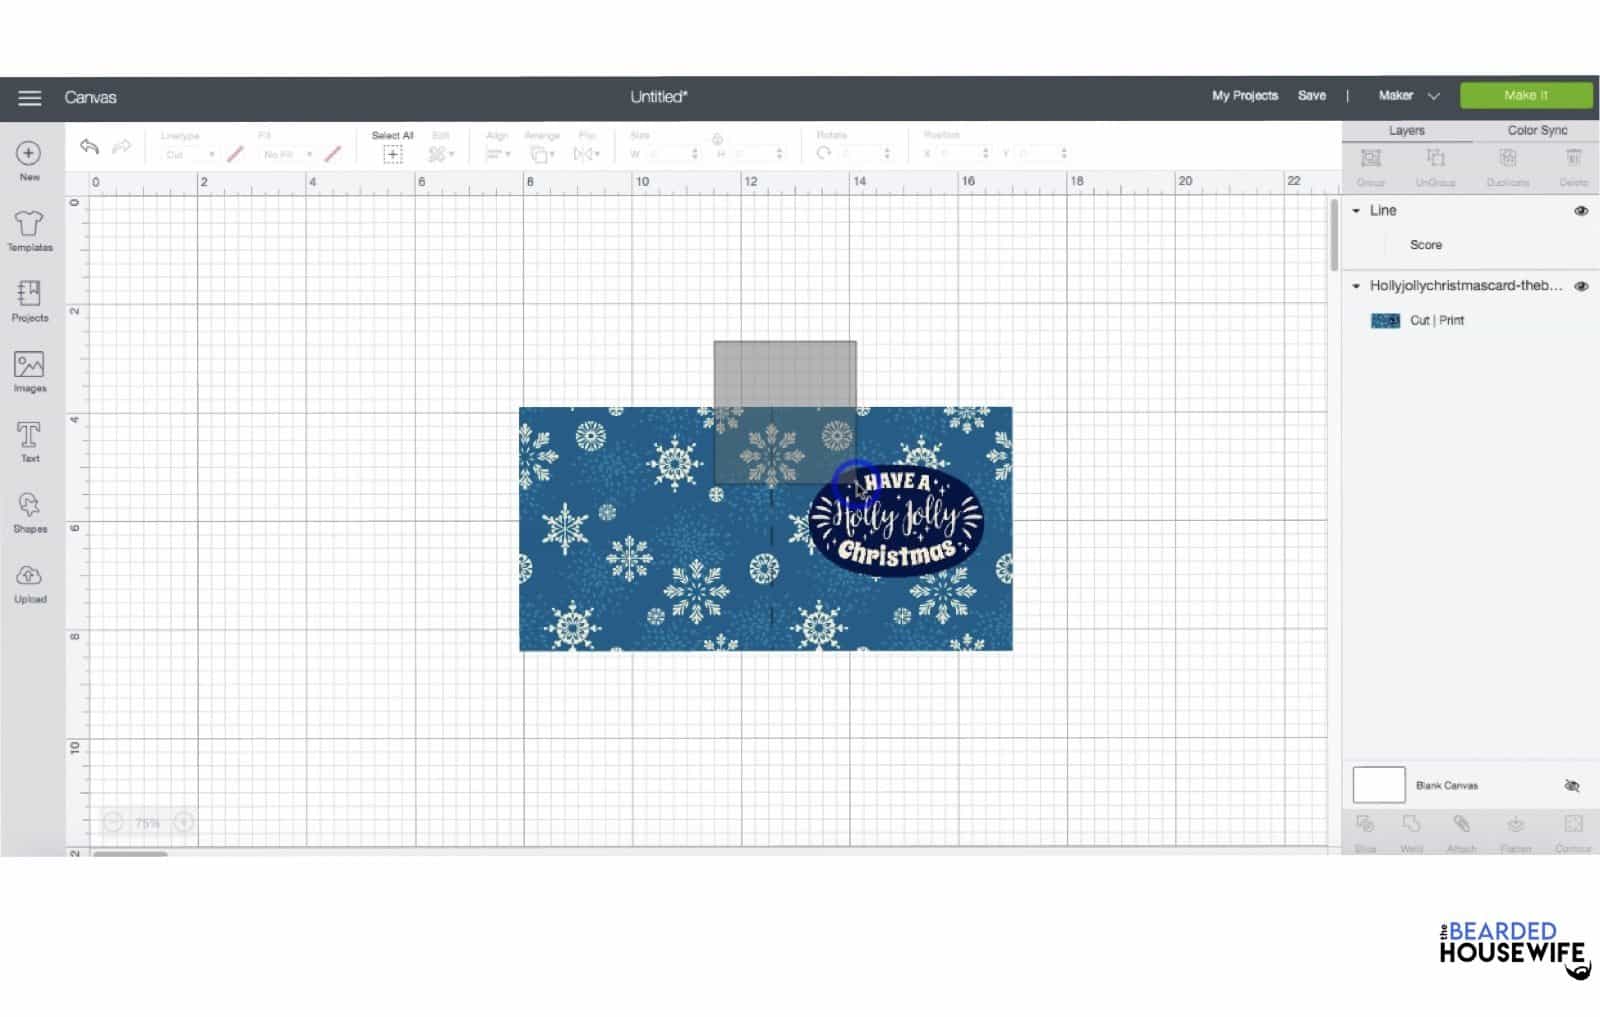
In the ALIGN panel, select CENTER. This will center your score line both horizontally and vertically.

Highlight both layers again.

In the right hand corner of the LAYERS panel, select ATTACH.

Click the green MAKE IT button in the upper right corner.

STEP 4 - PRINT YOUR IMAGE AND MAKE YOUR MATERIAL SELECTIONS
When you get to the PREPARE screen, you will see the print then cut image with the black box around it. Click CONTINUE.

Select SEND TO PRINTER.

Make sure you have the ADD BLEED optional toggled and click PRINT.

Once your image has been printed, make your materials selection. I am using Medium Cardstock.

For this tutorial, I am changing my pressure setting to MORE.

STEP 5 - LOADING YOUR MATS AND CUTTING YOUR MATERIALS
Attach your cardstock to the Cricut StandardGrip Mat.
To load the mat into the machine, press the double arrows button. Do make sure that the mat is positioned under the mat guides.

Hit the "C" button once it begins to flash and you are on your way to cutting out your card!

Once the cut is complete, the double arrows will flash again. Press it and the mat will unload.
To remove your card without any curling, pull the mat away from the cardstock rather than the cardstock from the mat.

STEP 6 - ASSEMBLE YOUR CARD
Now that you have your card printed and cut, it is time to finish assembling.

Gently fold along the score line.

Press the fold with your scraper.

You card is ready to add your sentiment.


I have included an envelope for you to make with this card. It is located in the ENVELOPE file folder for your download.
I just love the vibe of this retro design. I hope you do too!
Post a photo in the comment section or tag your projects on social media @thebeardedhousewife using the hashtag #beardedhousewife! I’d love to see how your cards turn out!!
Happy Holidays!

WANT TO MAKE GREETING CARDS AND PAPERCRAFTS ON YOUR CRICUT?
JOIN THE BEARDED HOUSEWIFE CRAFTERS CLUB TO GAIN ACCESS TO HUNDREDS OF SVG CUT FILES, PROJECTS, AND OUR EXCLUSIVE COMMUNITY!
WANT TO REMEMBER THIS POST FOR LATER? PIN THIS POST TO YOUR FAVORITE PINTEREST BOARD!
Responses