
Get Well Pop Up Cards

LEARN HOW TO MAKE GET WELL POP UP CARDS USING YOUR CRICUT
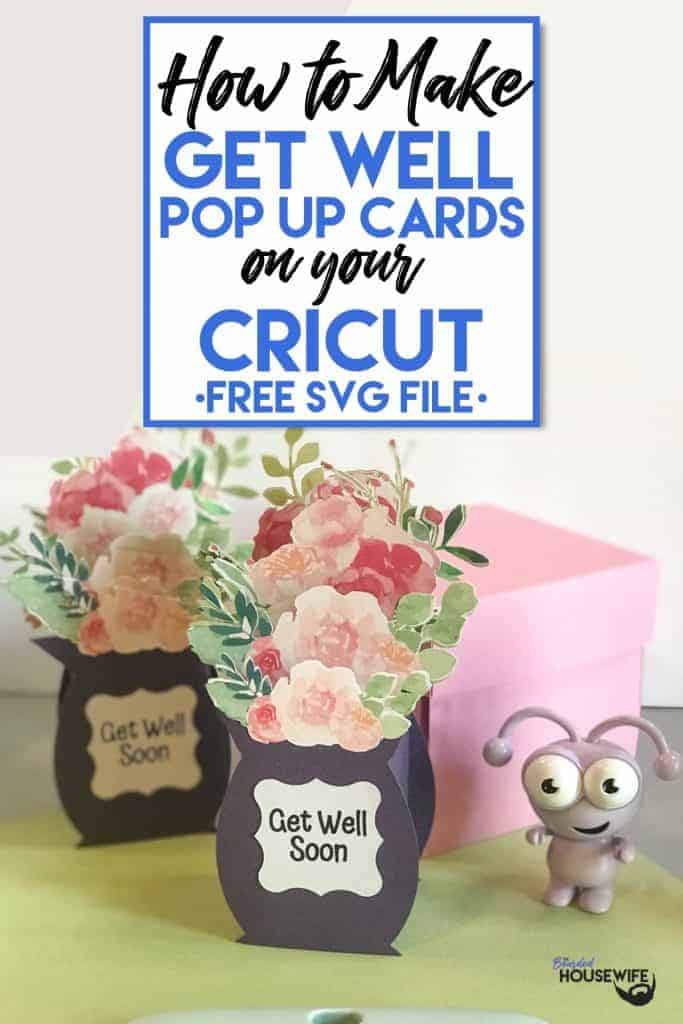
My cousin Kelli recently had surgery and I wanted to make her something special. I didn't want to just send the average get well card. It needed to be something special, something pretty that she could maybe sit on her table. So, I designed this darling get well pop up card for her!
This card uses the print then cut function on your Cricut. It also uses the scoring wheel or stylus which means you won't be able to use the Cricut Joy for this tutorial. However, the file does come with PDF versions of the card that you can print onto cardstock using your home printer and cut out by hand!
In this tutorial, I’ll give you my step by step instructions and tell you what materials I think work best when making this project.
Basic and Premium TBH Crafters Club Members can download the SVG cut file for this project in the File Library.
Not a Member? Click here or the link at the bottom of the page to join!
This post contains some affiliate links (which means if you make a purchase after clicking a link, I will earn a small commission at no additional cost to you). Read my full disclosure policy here.
GET WELL POP UP CARD – MATERIALS LIST
- I am using the FABULOUS Cricut Maker. You could also use your Cricut Explore Air 2 !
- Cricut Scoring Wheel or Scoring Stylus
- Cricut StandardGrip Cutting Mat (green)
- Cricut Cardstock
- Cricut Printable Sticker Paper, optional
- Glue. I am using Art Glitter Glue.
- Cricut Scraper

Get Well Pop Up Cards
This simple to follow tutorial will show you how to create a beautiful one of a kind get well card that can be set on a coffee table as a reminder to your loved one that you care!
Materials
- My Get Well SVG File
- Cricut Cardstock
- Cricut Sticker Paper, optional
- Art Glitter Glue
Tools
- A way to cut your cardstock. I am using my FABULOUS Cricut Maker. This project will certainly work with the Cricut Explore Air 2!
- Cricut Scoring Wheel or Scoring Stylus
- Cricut StandardGrip Cutting Mat (green)
- Cricut Fine Point Pen, color optional
Instructions
STEP 1 - DOWNLOAD THE SVG CUT FILE
Download the SVG Cut file for the Get Well Pop Up Card (#23) from The File Vault. Get access by joining the club.
STEP 2 - UPLOAD THE SVG FILE TO CRICUT DESIGN SPACE
If you aren't familiar with uploading SVG files into Design Space, take a look at my quick and easy tutorial here. Using your smartphone? Click here for my step-by-step guide on uploading SVG files with the Cricut App.
STEP 3 - UNGROUP CARD LAYERS
The file will upload into Cricut Design Space grouped together. You will want to hit the UNGROUP button to separate the layers.

STEP 4 - CONVERT CUT LINES TO DRAW LINES
I am wanting my Cricut to draw the "Get Well Soon" onto my cardstock. To do this, first scroll down the list in the LAYERS panel and find the emblem. Click the text line.

Change the text to draw by changing the LINE TYPE from CUT to DRAW.

Attach the text and the emblem by highlighting the GROUP.

Select the ATTACH option in lower right hand corner.

STEP 5 - CONVERT FOLD LINES TO SCORE LINES ON FLOWER POT
Scroll down the list in the LAYERS panel and find the purple flower pot layers. Click the fold lines on the rectangular piece.

Change the fold lines to score lines by changing the LINE TYPE from CUT to SCORE.

Attach the score lines and flower pot layer by highlighting the GROUP.

Select the ATTACH option in lower right hand corner.

Repeat for the second piece of the flower pot.
STEP 6 - CONVERT FOLD LINES TO SCORE LINES ON FLOWER INSERTS
Scroll down the list in the LAYERS panel and find the first of the three flower insert layers. Click the vertical fold lines.

Change the fold lines to score lines by changing the LINE TYPE from CUT to SCORE.

Attach the score lines and flower inserts by highlighting the GROUP.

Select the ATTACH option in lower right hand corner.

Repeat for the remaining two flower insert layers.
STEP 7 - UPLOAD THE PRINT THEN CUT FILES INTO DESIGN SPACE
Follow step 2 to upload the print then cut jpeg files into design space.
After uploading the file, select COMPLEX.

Click the green CONTINUE button.
Zoom out and select the wand in the upper left hand corner.

Click the black background on the image.

The black color will erase. Click CONTINUE.

You want to save this file as a PRINT THEN CUT image.

Click SAVE.

Repeat this step for the two remaining print then cut flower images.
STEP 8 - ATTACH AND FLATTEN PRINT THEN CUT IMAGES
Select one of the jpeg images you just imported by highlighting it.

Then click INSERT IMAGE.

Resize the jpeg to the appropriate width. For the flowers, the sizing is as follows.
-Flowers1 jpeg - 3.186 inches
-Flowers2 jpeg- Smaller: 2.831 inches, Larger: 3.761 inches
-Flowers3 jpeg - 3.263 inches
Drag the jpeg over the matching white cut layer.

Highlight both layers.

Select FLATTEN on the lower right hand corner

Repeat for the remaining two layers.
For the flowers2 jpeg, you will need to SLICE the two flower bundles. To do this, first create a square and resize to cover the bottom flower bundle.

Highlight both layers.

Select SLICE on the lower right hand corner.

Delete the extra layers from the slice leaving the now separated flower bundle.
Once all three flower insert layers are complete, click the green MAKE IT button.
STEP 9 - MAKE YOUR MATERIAL SELECTIONS AND PREPARE YOUR MATS
For this tutorial, I am using Cricut Sticker Paper for the Print then Cut images. This is totally optional but I like how easy it is to use sticker paper for small cuts like this.

You will see the PRINT THEN CUT mat appear. Click CONTINUE.

Click SEND TO PRINTER.

Make sure you have ADD BLEED selected. Click PRINT.

Once printed, you can continue with your material selections and prepare your mats accordingly.
STEP 10 - LOADING YOUR MATS AND CUTTING YOUR MATERIALS
Attach your cardstock to the Cricut StandardGrip Mat.
To load the mat into the machine, press the double arrows button. Do make sure that the mat is positioned under the mat guides.

Hit the "C" button once it begins to flash and you are on your way to cutting out your card!

Follow the instructions in Design Space to switch out the scoring wheel for the cutting blade. Once the cut is complete, the double arrows will flash again. Press it and the mat will unload.
When removing the card, peel your mat away from the card rather than peeling your card away from the mat. This will help prevent curling.

Repeat Step 10 until all layers are cut.
STEP 11 - ASSEMBLE YOUR CARD
Start by gluing the Get Well Soon emblem to the flower vase.


Repeat for the back fo the vase. This is the area you will personalize your card!
Fold along the score lines of the flower inserts and press with your Cricut Scraper.

Attach the print then cut image to the insert.

Repeat for the remaining flower inserts.
Now, fold along the score lines of the flower vase sides and press with your Cricut Scraper.

Add glue along the folded tab.

Attach to the flower vase making sure the tabs are folded inward.

Repeat for the other side and do the same thing for the second piece.


Once you have your flower vase glued, gently press to make sure it folds flat.

Now, glue the flower inserts to the pot. Add glue to the tabs.

Line up the bottom of the insert and press the tabs against the side of the flower vase.

Press gently to make sure your card folds flat.

Repeat for the remaining two flower inserts.
Add the smallest flower bundle to the front of the vase.

You are all set! The card is ready for you to personalize!

I just know that anyone you send this to will enjoy it! It is so pretty. You could even leave the “Get Well” message off and send to them as a little pick me up if they are having a rough time. I am going to place one in our guest room and hallway table in the foyer!
Post a photo in the comment section or tag your projects on social media @thebeardedhousewife using the hashtag #beardedhousewife! I’d love to know what you think!
Love,

WANT TO MAKE GREETING CARDS AND PAPERCRAFTS ON YOUR CRICUT?
JOIN THE BEARDED HOUSEWIFE CRAFTERS CLUB TO GAIN ACCESS TO HUNDREDS OF SVG CUT FILES, PROJECTS, AND OUR EXCLUSIVE COMMUNITY!
WANT TO REMEMBER THIS POST FOR LATER? PIN THIS POST TO YOUR FAVORITE PINTEREST BOARD!
I don’t see the get well svg in your library. How do I get it?
Hi, Shawn! Thanks for reaching out!
The file download is at the very top of the list in the resource library. If you don’t happen to see it listed, refresh your browser and it should show up!
Let me know if you have any other problems!
Thanks for being here!
Nick
I have a question. You have five flowers, However there are only three inserts. That is where I have three of the flowers. What am I missing?
Thank you. Very cute card!
Hi, Carolyn! I’m glad you enjoy the card!
The print then cut files only have four flowers. Three of them fit onto their corresponding inserts to go inside the vase. The last print then cut image I used on the outside of the vase near the lip to add more dimension. I hope that helps clear up any confusion!
Thanks for reaching out! Let me know if you have any other questions!
Hi was just wondering once I print the flowers how did they cut perfectly? Do I put it back into my cricut machine?
Hi, Angela!
Thanks for reaching out. Yes, once you print out the flowers, you place the printed sheet onto your Cricut cutting mat as directed by the mat preview in Design Space. Then, the machine will cut out your flowers for you!
I hope that answers your question! Let me know if you need any more help!
Thanks for being here. Happy Crafting!
Nick
Hi,
Can this be used with the Scan n Cut.❤️🏴
Hi!
I am not familiar with the Scan n Cut so I am unsure if the file will work for that cutting machine. Does it offer print then cut options? I’d hope so since it is in the name! Lol. What file types does it support?
Hello,
Thank you for the SVG of the Get Well Flower Vase. I duplicated the flowers, then reversed the duplicates, and glued them back to back. This allowed my card to show the flowers from the back as well as the front. Turned out beautifully. Thanks again.
Nadine,
It’s my pleasure. Your idea to have the flowers visible on both sides is incredible! Well done.
I’m glad you enjoyed the project. I’d love to see pictures of your completed one!
Happy Crafting,
Nick
I love these. I just tried making them and after it’s all said and done…it doesn’t fold flat. I see a little pink box. Do you suggest it gets sent in a box, or an envelope. I’m going to try again to make sure I get everything evenly aligned.
Hi, Lisa!
I’m so glad you like the pop up card!
I’m not quite sure what you mean by “I see a little pink box.” If you’d like to email me, you could send me a picture of what you’re referring to!
The card itself will fold flat enough to fit in an envelope. It doesn’t fold COMPLETELY flat but enough to slip inside the envelope I included with your download.
Let me know if you need more help!
Thanks!
I have two things. First, what is the purpose of flattening the flowers over the white corresponding pieces? Since you specified the exact width of each flower, I didn’t see a purpose for the flattening or even having the white shapes. Maybe I missed something? I didn’t get to finish it because my Cricut has stopped scoring but I still want to do it.
Second thing: It lessen the bulk, why not have flaps on the front and back flower “stems”. Just glue the back piece (without the flaps) to the back of the pot and the same with the front. Then that leaves just the middle insert with flaps. That would certainly make it less bulky. I think this is such a CUTE idea! I used the gold paint pen to make a border around the little white pieces and it looks cool. I may try folding them by hand but I am not good at getting things straight!
Hi, Thank You for the cutest card. I have made three of them this evening and love them. I do have one question though, Is there any way to change the colors of the print then cut. I am fairly new to this stuff and not even sure that would be an option or not. I love this file and wanted to make a few more, but was thinking of different colors. Also I made your Z gnome card and it came out adorable. My mom, whom happens to love gnomes loved it. Thanks for all you do and share. Grace
Hi, I love this project!!!! I just fall in love with it! Thank you so much for shering! You are so talented!